
How to Share a Google Calendar Step by Step


Create your free booking page

If you're trying to figure out how to share your Google Calendar, you’re in the right place.
Google's calendar app offers powerful features to keep you organized. You can create multiple calendars, color-code events for better clarity, and share your schedule with others seamlessly. It’s a great tool loved by millions of people for managing both personal and professional schedules.
In this practical guide, you’ll learn:
- How to create a Google Calendar if you don’t have one yet.
- How to create and share calendar events.
- Four different ways to share your calendar with others.
Let’s jump right in and get started!
Before you can share your calendar, you’ll need to make sure you have one set up. Already have a calendar? Feel free to jump to the next section! If not, here’s how to get started:
Step 1: Log in to your Google account
Head over to Google Calendar and sign in with your Google account. If you don’t have one yet, creating a Google account is quick and free.
Step 2: Create a new calendar
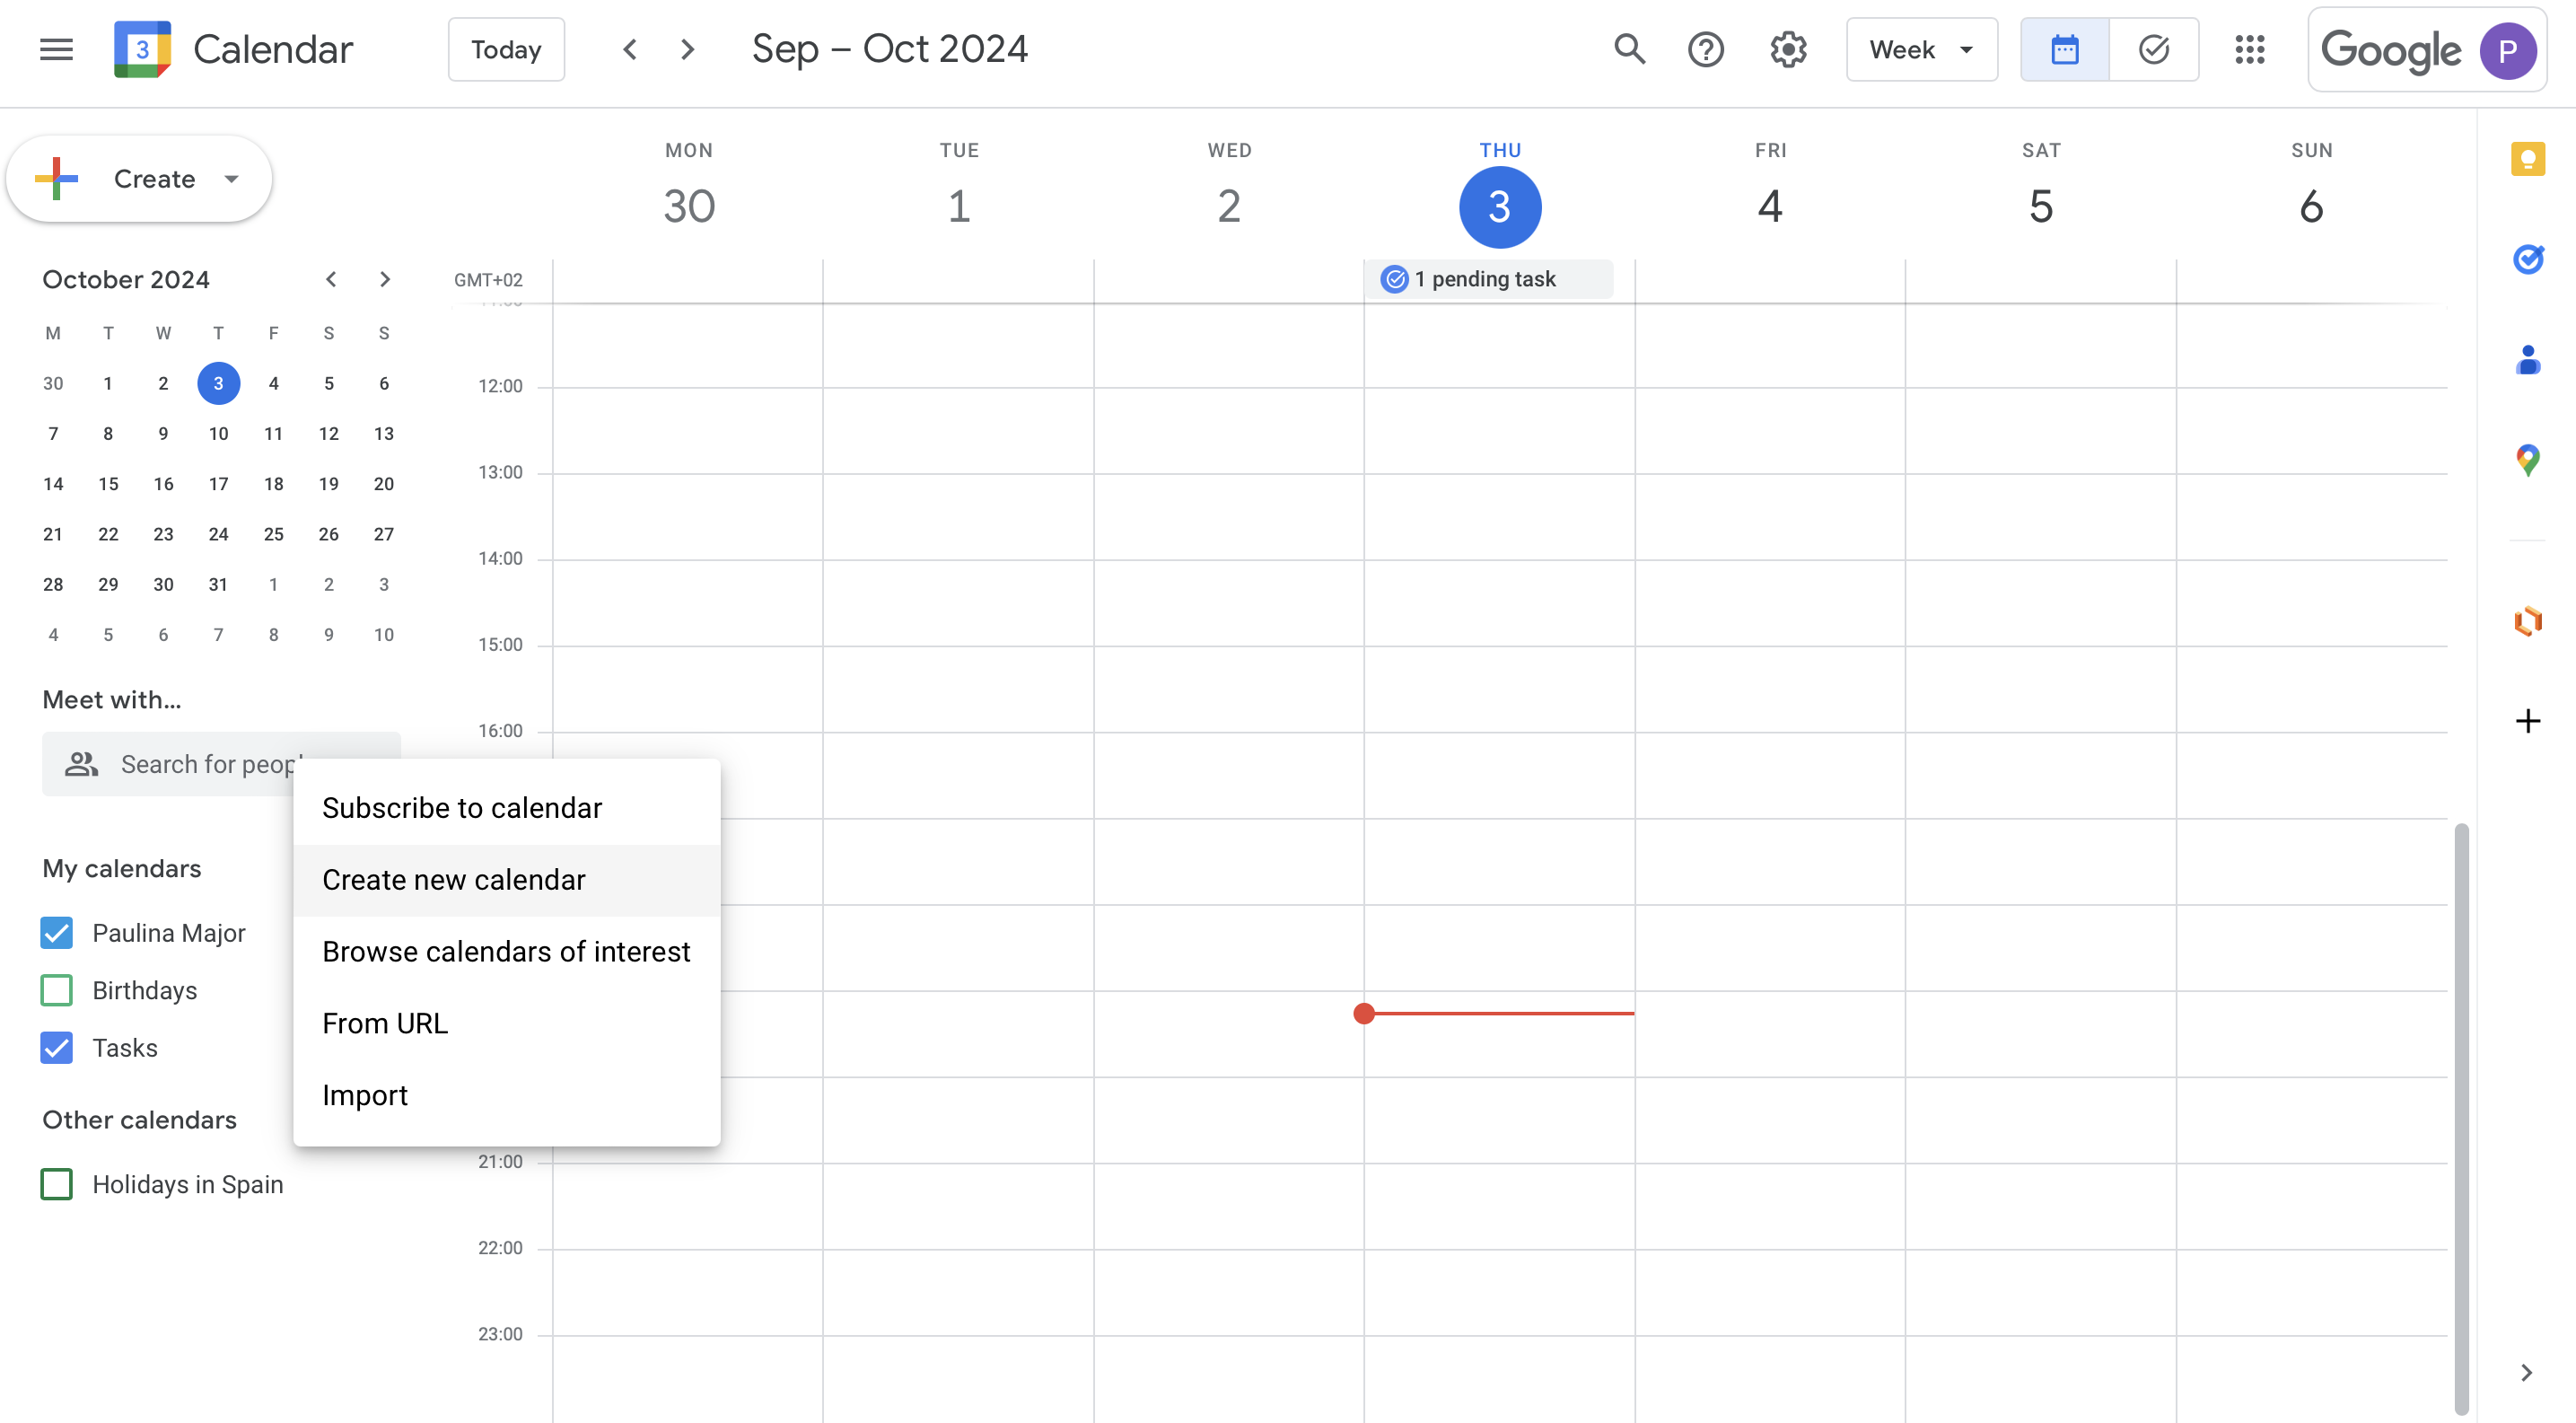
On the left side, find the "Other Calendars" section. Click the plus sign (+) next to it, then select Create New Calendar.
Step 3: Add calendar details
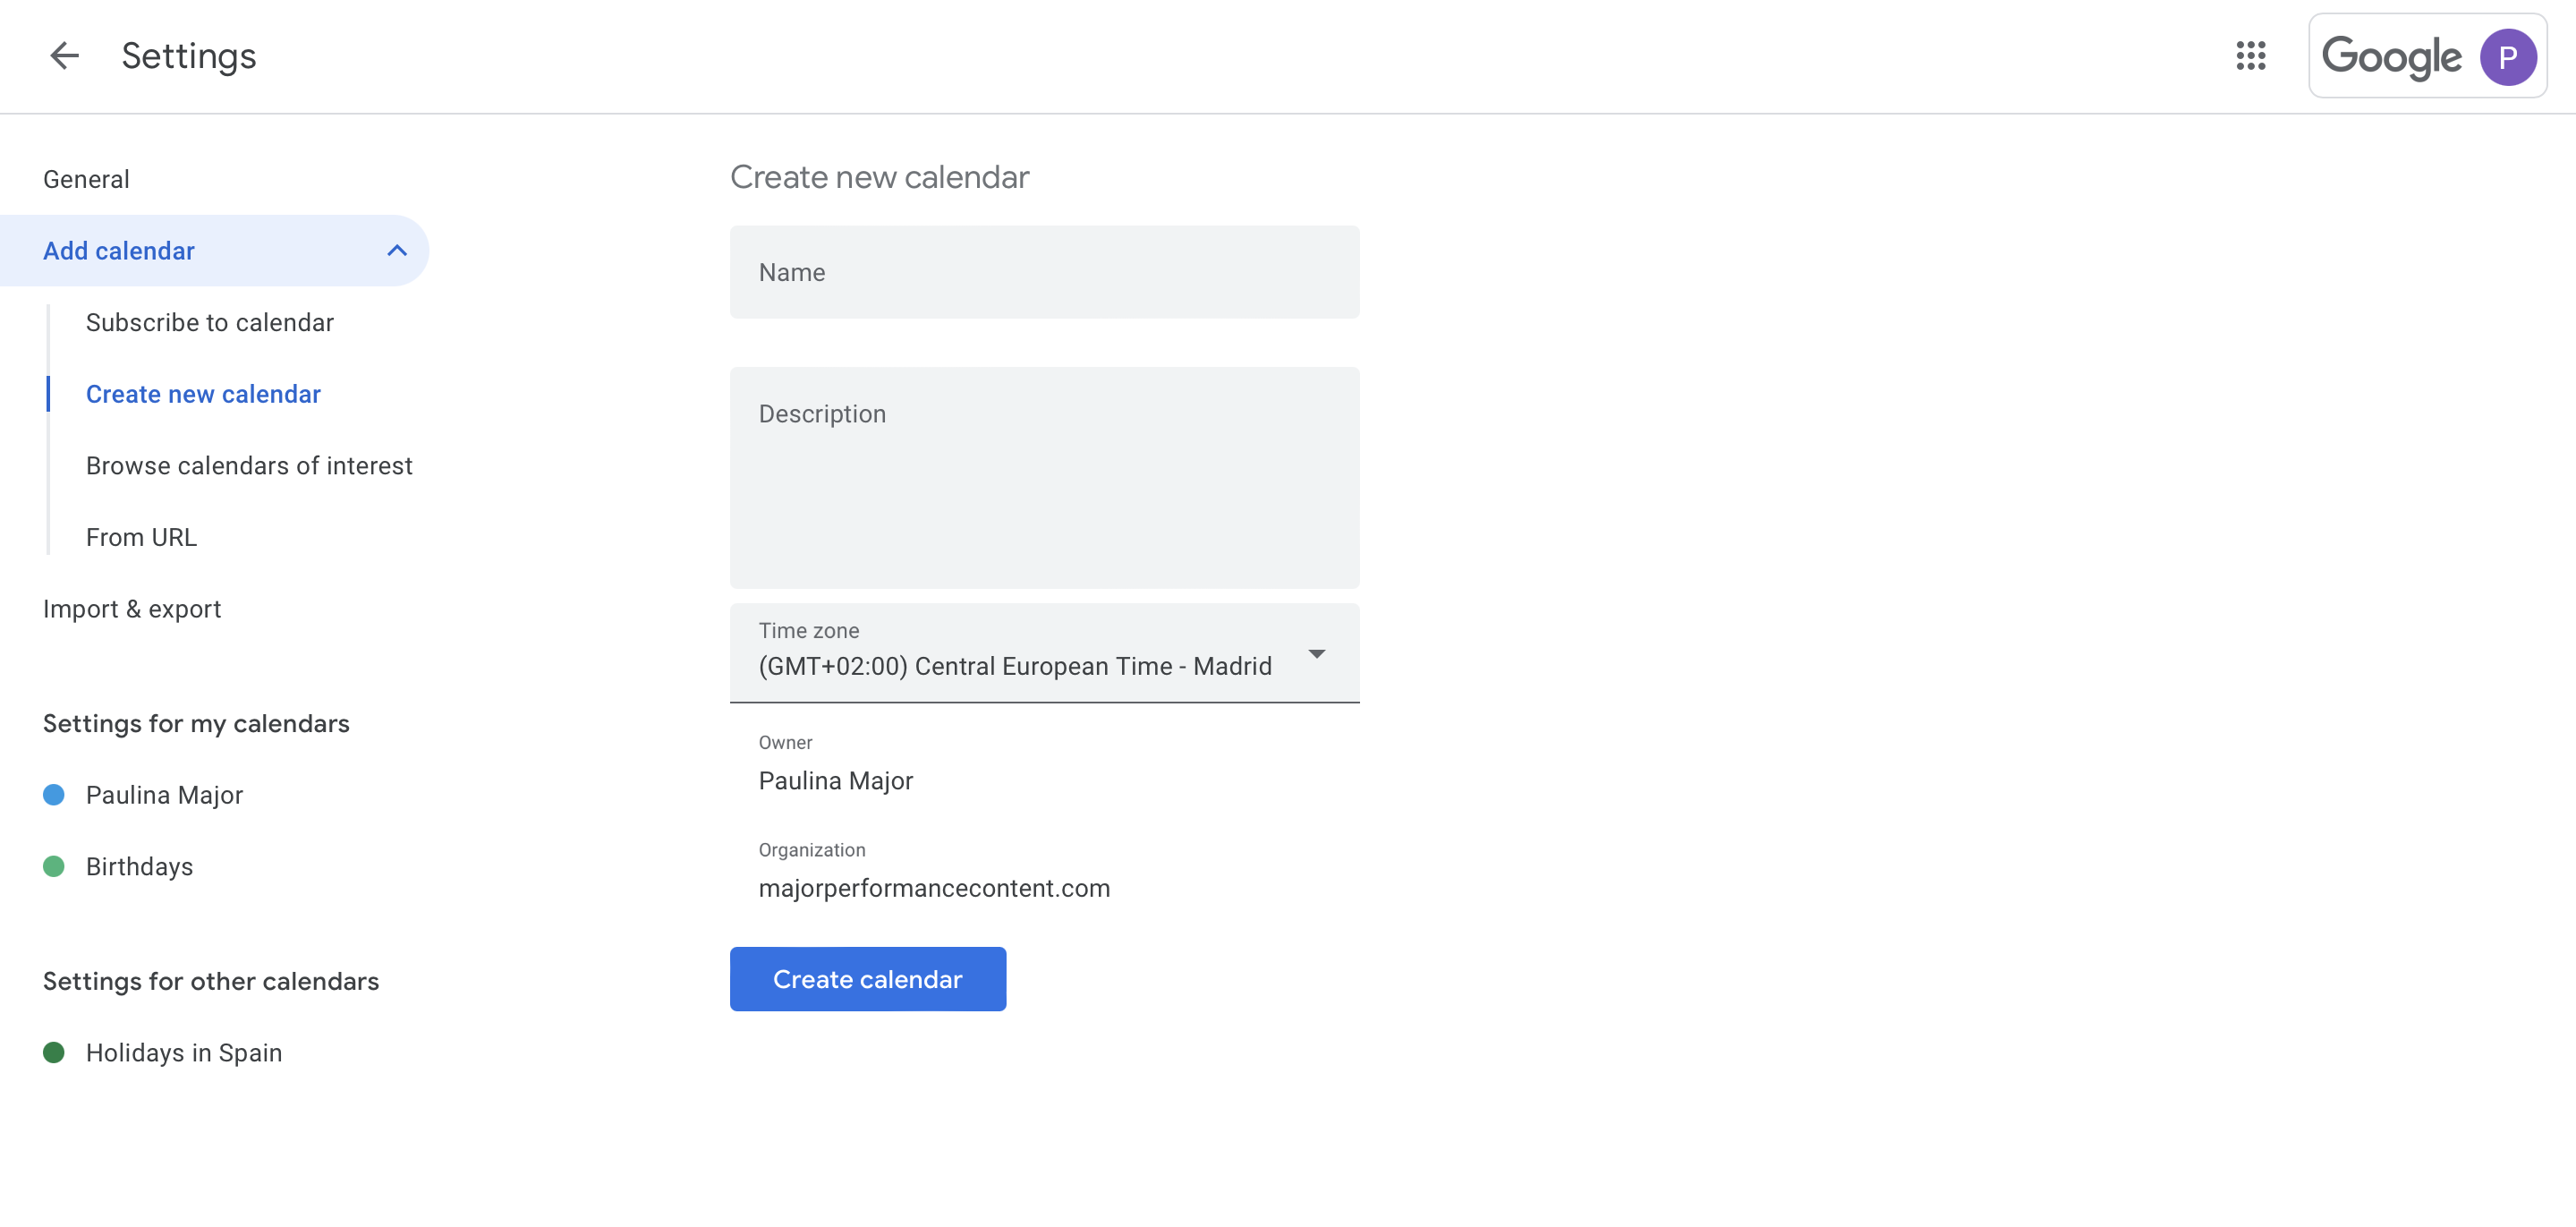
Name your calendar, add a description if you’d like, and set the correct time zone. Once you’ve filled in the details, click Create Calendar.
Step 4: Customize your calendar's sharing settings
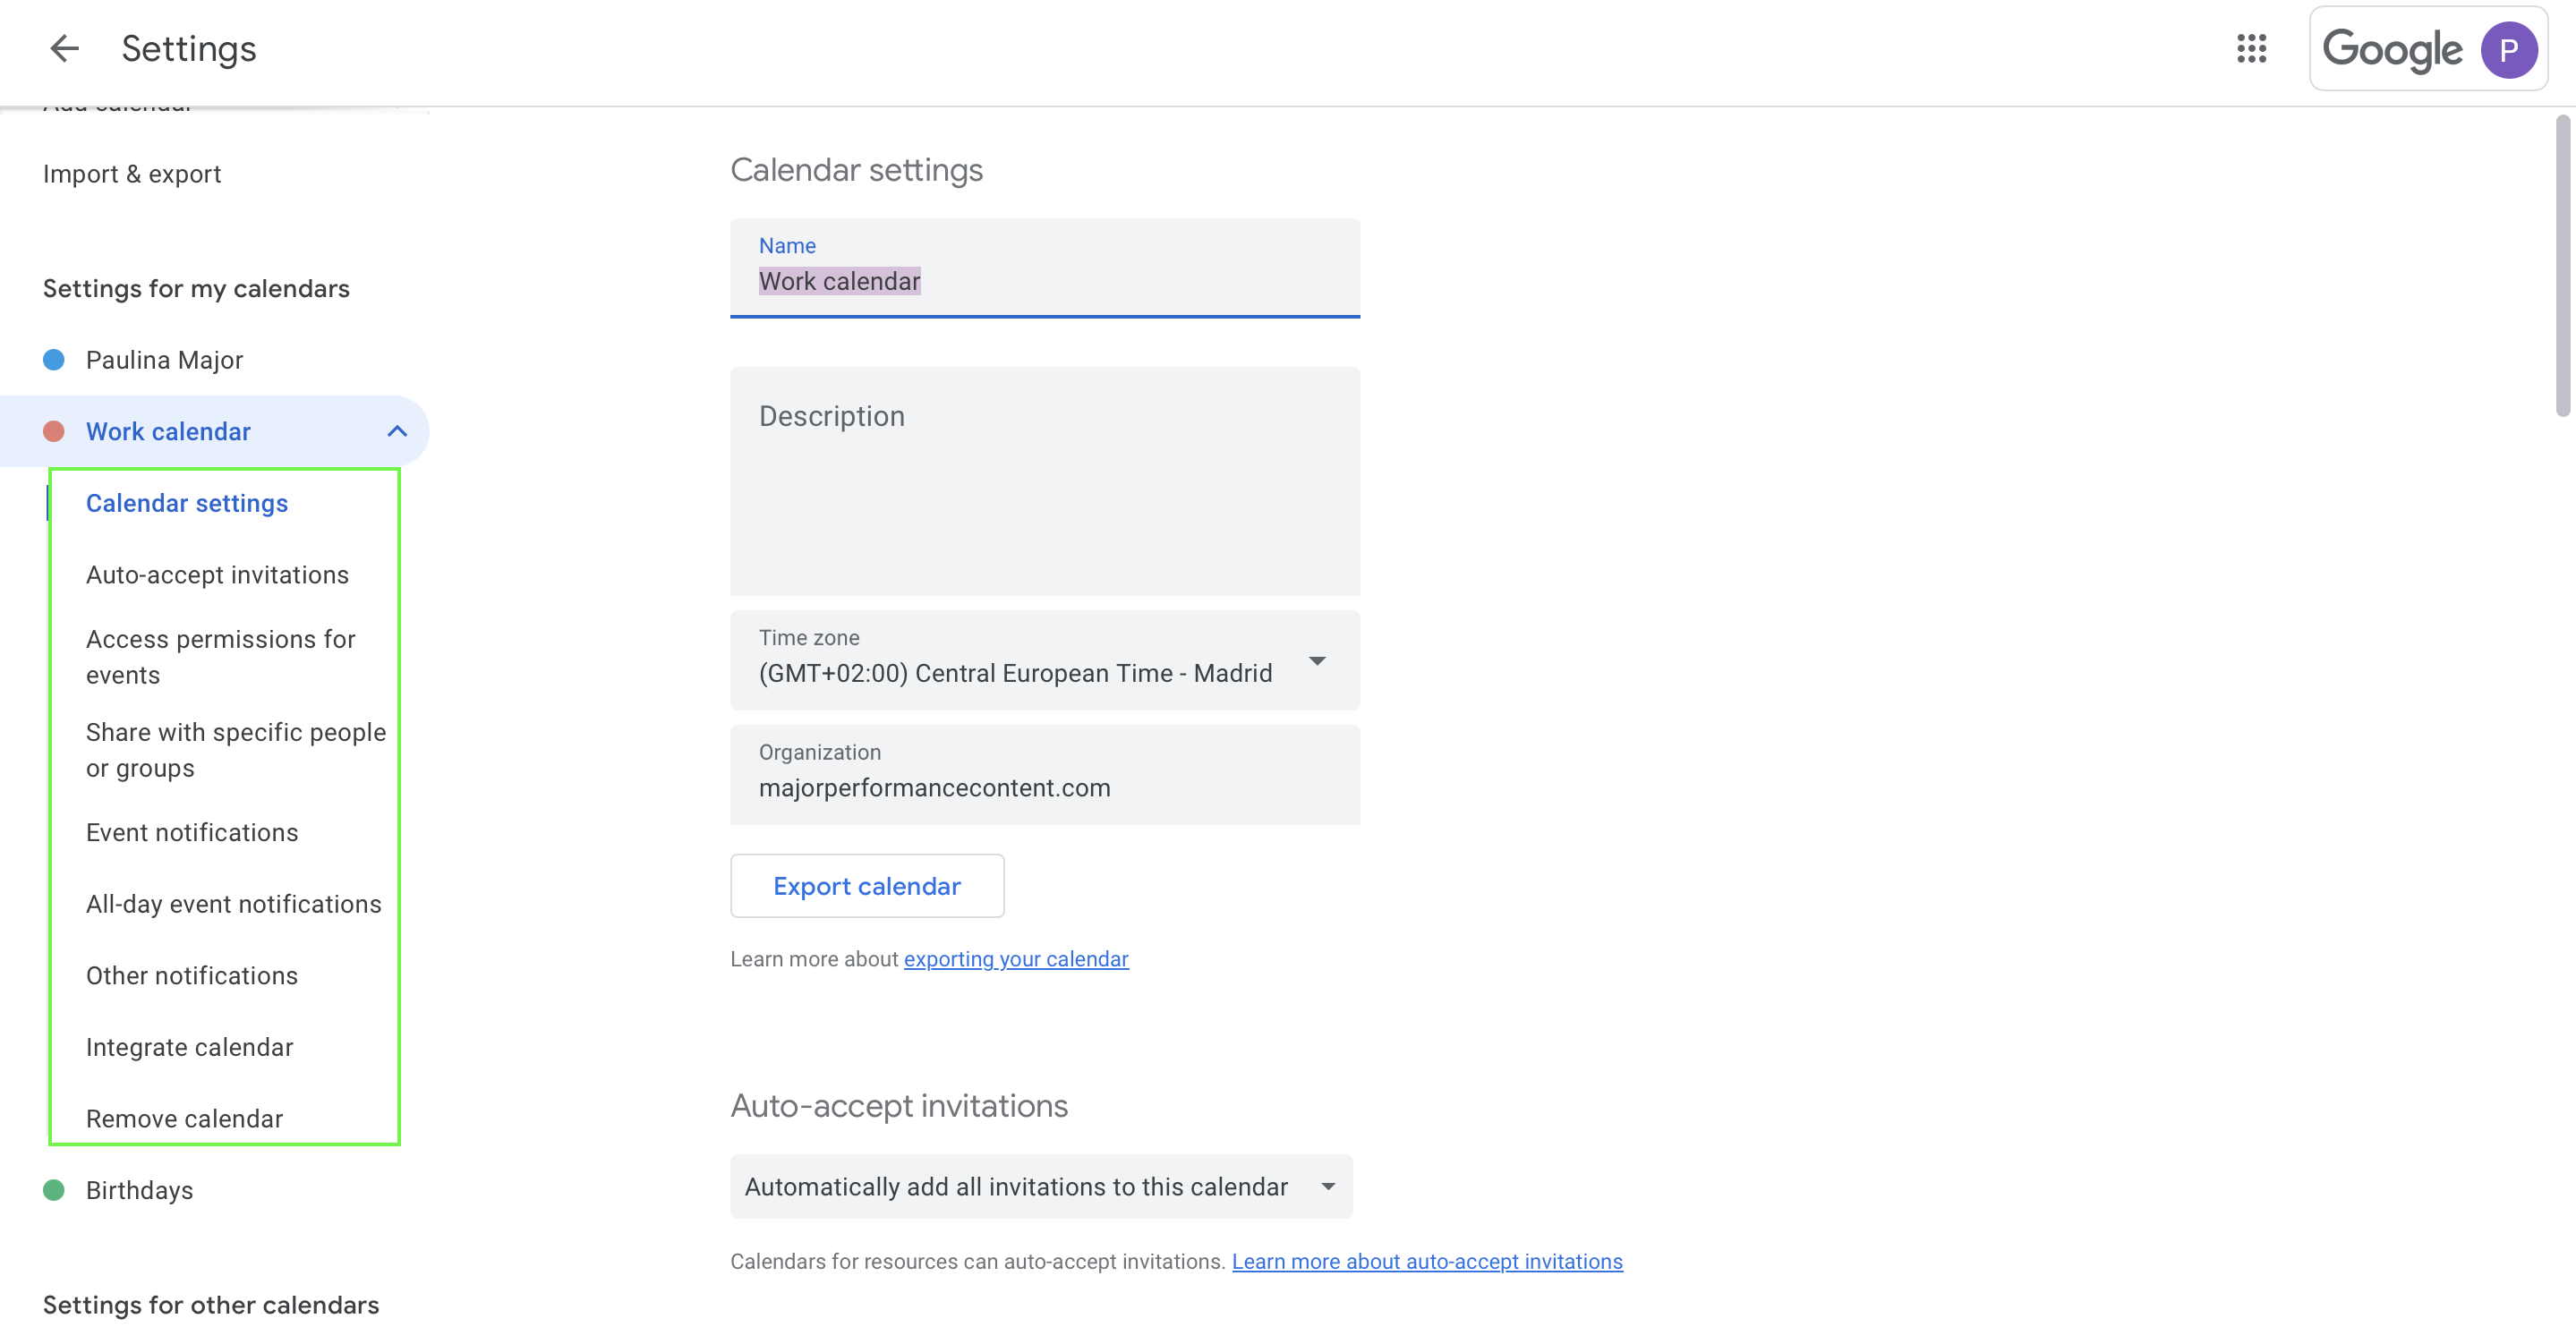
After creating your calendar, you can personalize it by adjusting the permissions, sharing options, and notifications under the Settings menu on the left.
And you’re all set! Now, you’re ready to start adding events and sharing them with others.
⭐️ Keep in mind that if you have a work or school account, you should check with your administrator in case they've placed sharing restrictions.
Once your account is set up, the next step is to start creating events. This functionality is particularly useful for scheduling business meetings, client appointments, or even family gatherings.
Just follow these simple steps:
Step 1: Open your Google Calendar
Navigate to the Google Calendar app and select the calendar where you want to create the event. For the purpose of this guide, we’ll be creating an event within the Work Calendar I just set up.
Step 2: Click on the desired date and time when you want to create the event. A small window will pop up where you can enter event details.

Step 3: Add event details
In the pop-up window, type the event name (e.g., “Team Meeting” or “Client Call”). You can also adjust the time, set it as an all-day event, or even make it a recurring event by clicking “More Options.”
Step 4: Customize your event
You can add a location, video conferencing link (via Google Meet), event description, and invite attendees by adding their email addresses. Google Calendar will send them an invitation automatically. You can also access permission settings here. But more on that later.
Step 5: Save the event
Once you’ve added all the details, click Save. The event will now appear on your calendar.
And that’s it. In just five steps, you’ve created your first event. In the next section, we’ll teach you how to share it with others.
There are several ways to share your calendar event with specific people or groups. Let’s go through each option together.
Step 1: Open the event you want to share
Find the event on your calendar and double-click on it to open the event details.
Step 2: Add guests to the event
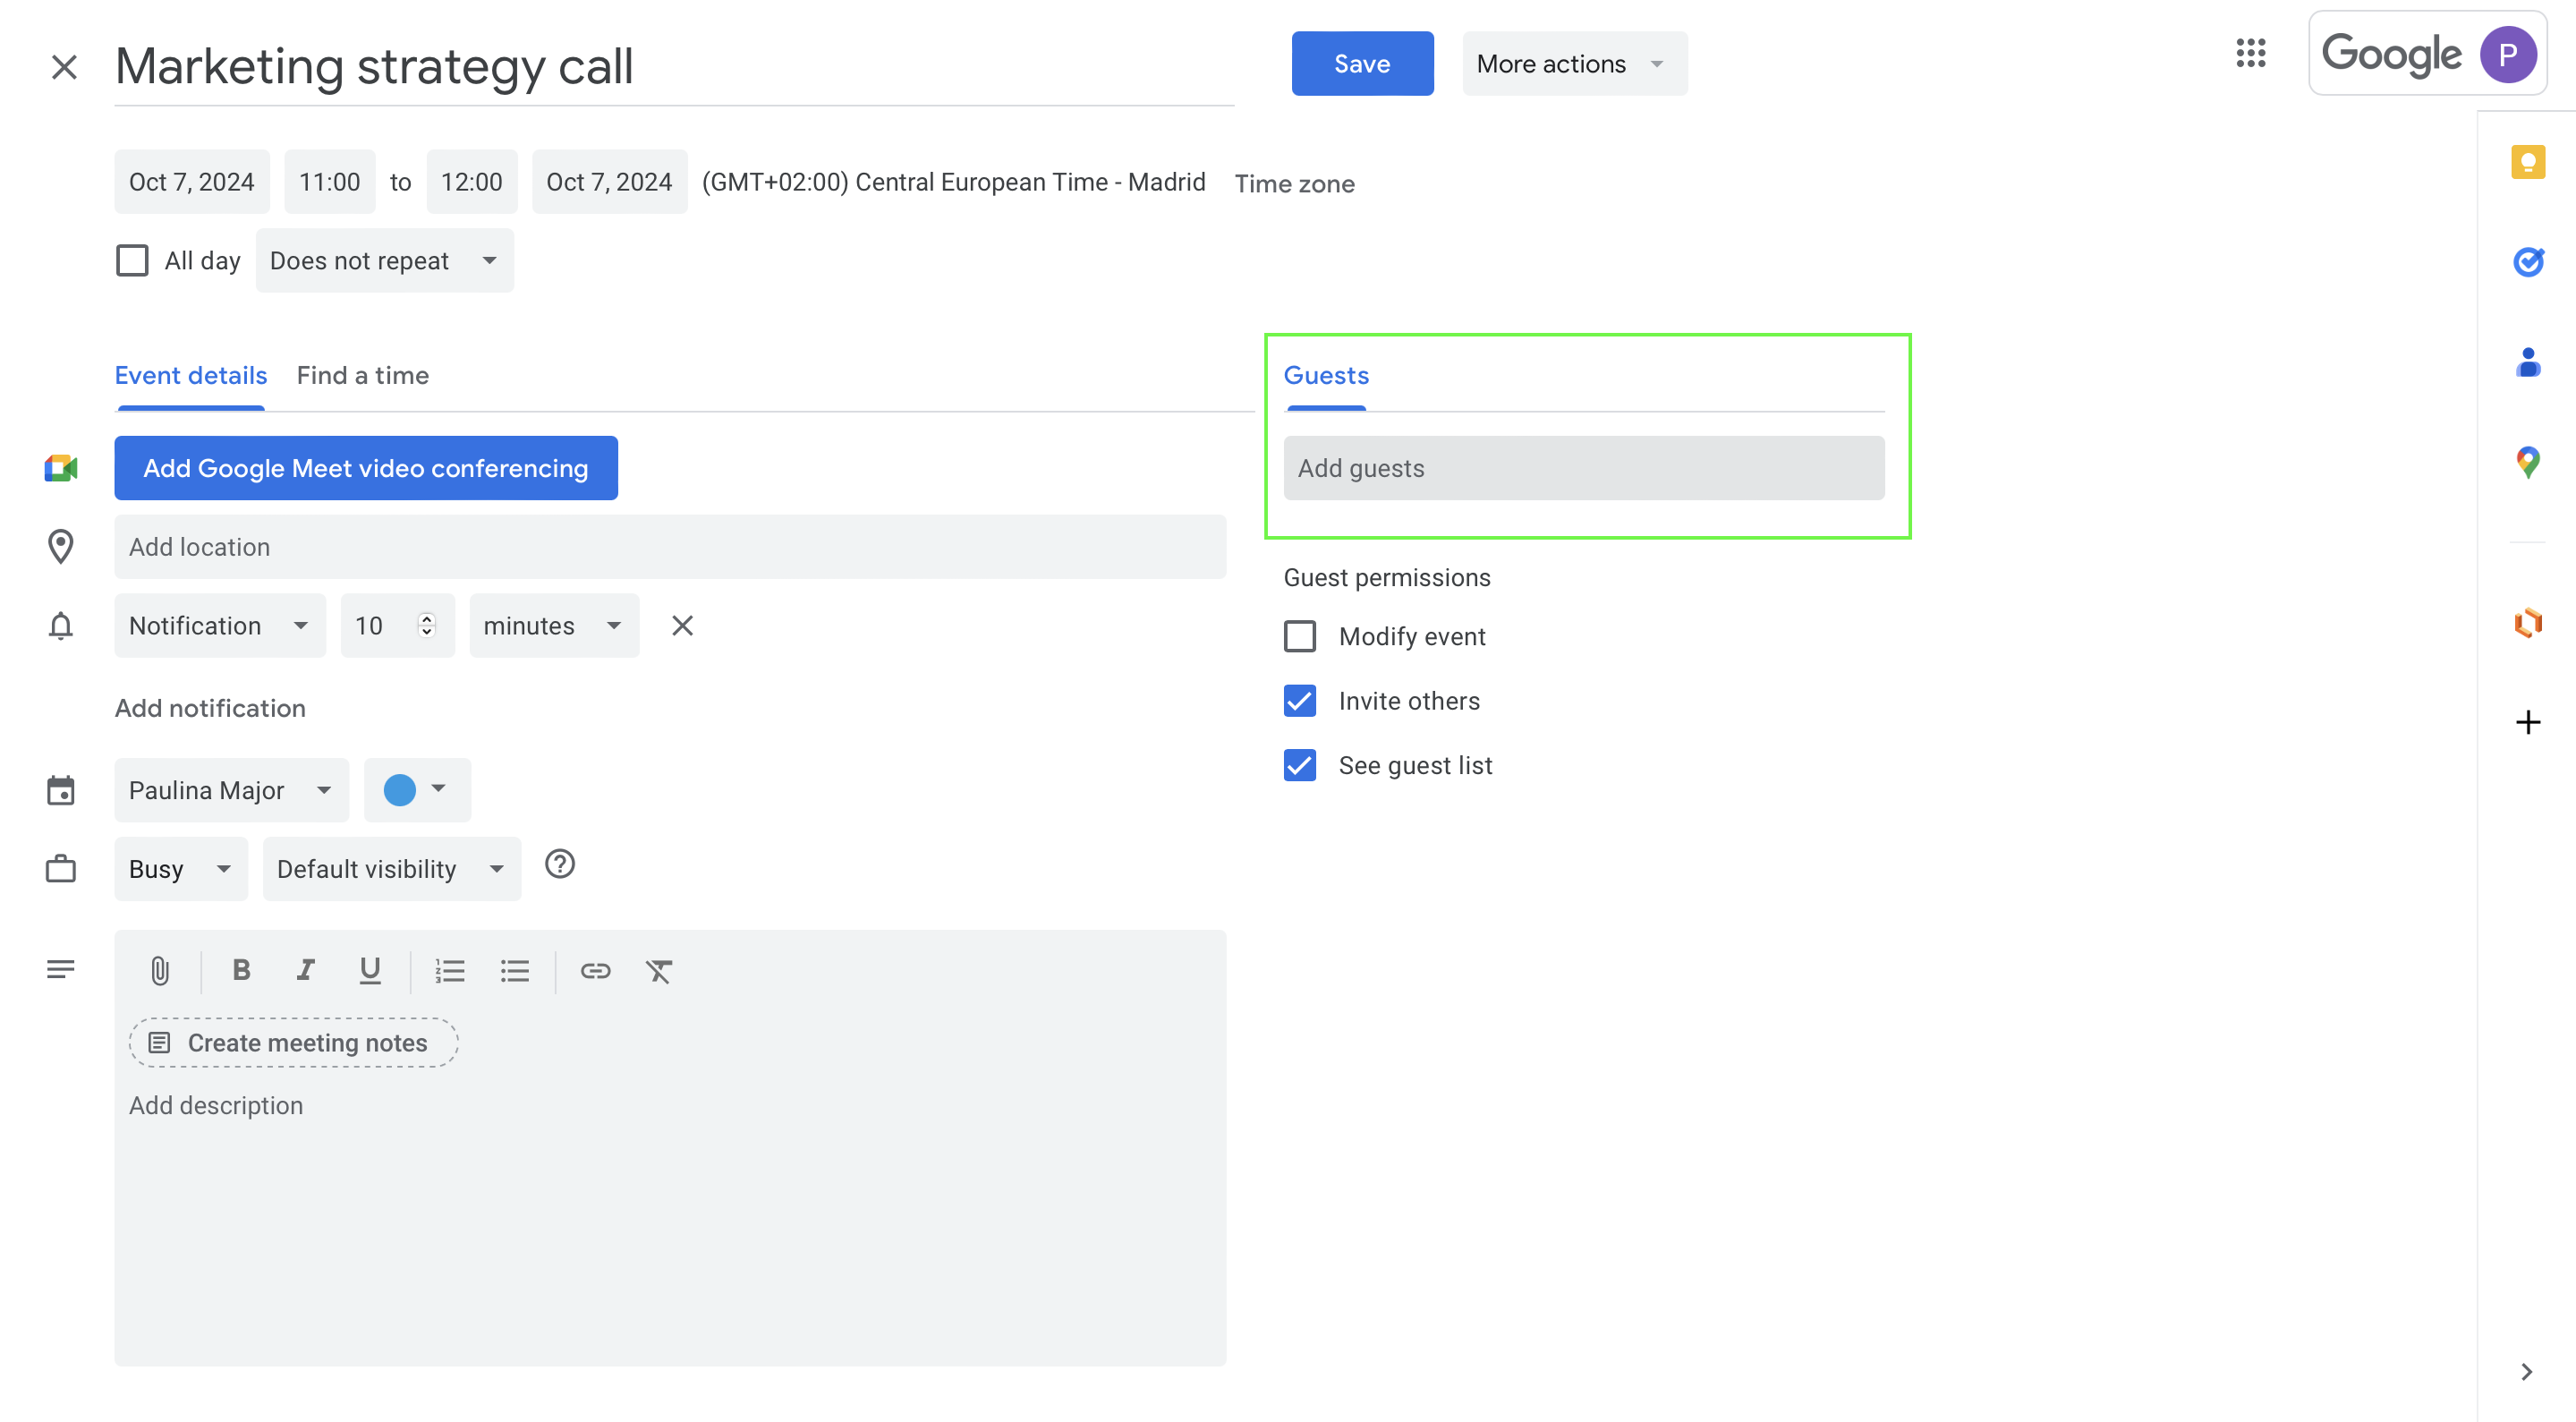
In the event window, look for the Add Guests section on the right. Type in the email addresses of the people you want to invite. You can add multiple guests by separating their email addresses with commas.
Step 3: Customize guest permissions
Below the guest list, you’ll be able to access permissions for events. From these options, you can allow guests to modify the event, invite others, or see the guest list. Choose what works best for your event.

From this view, you can also manage sharing settings around visibility, whether it's default visibility options or to set your calendar public.
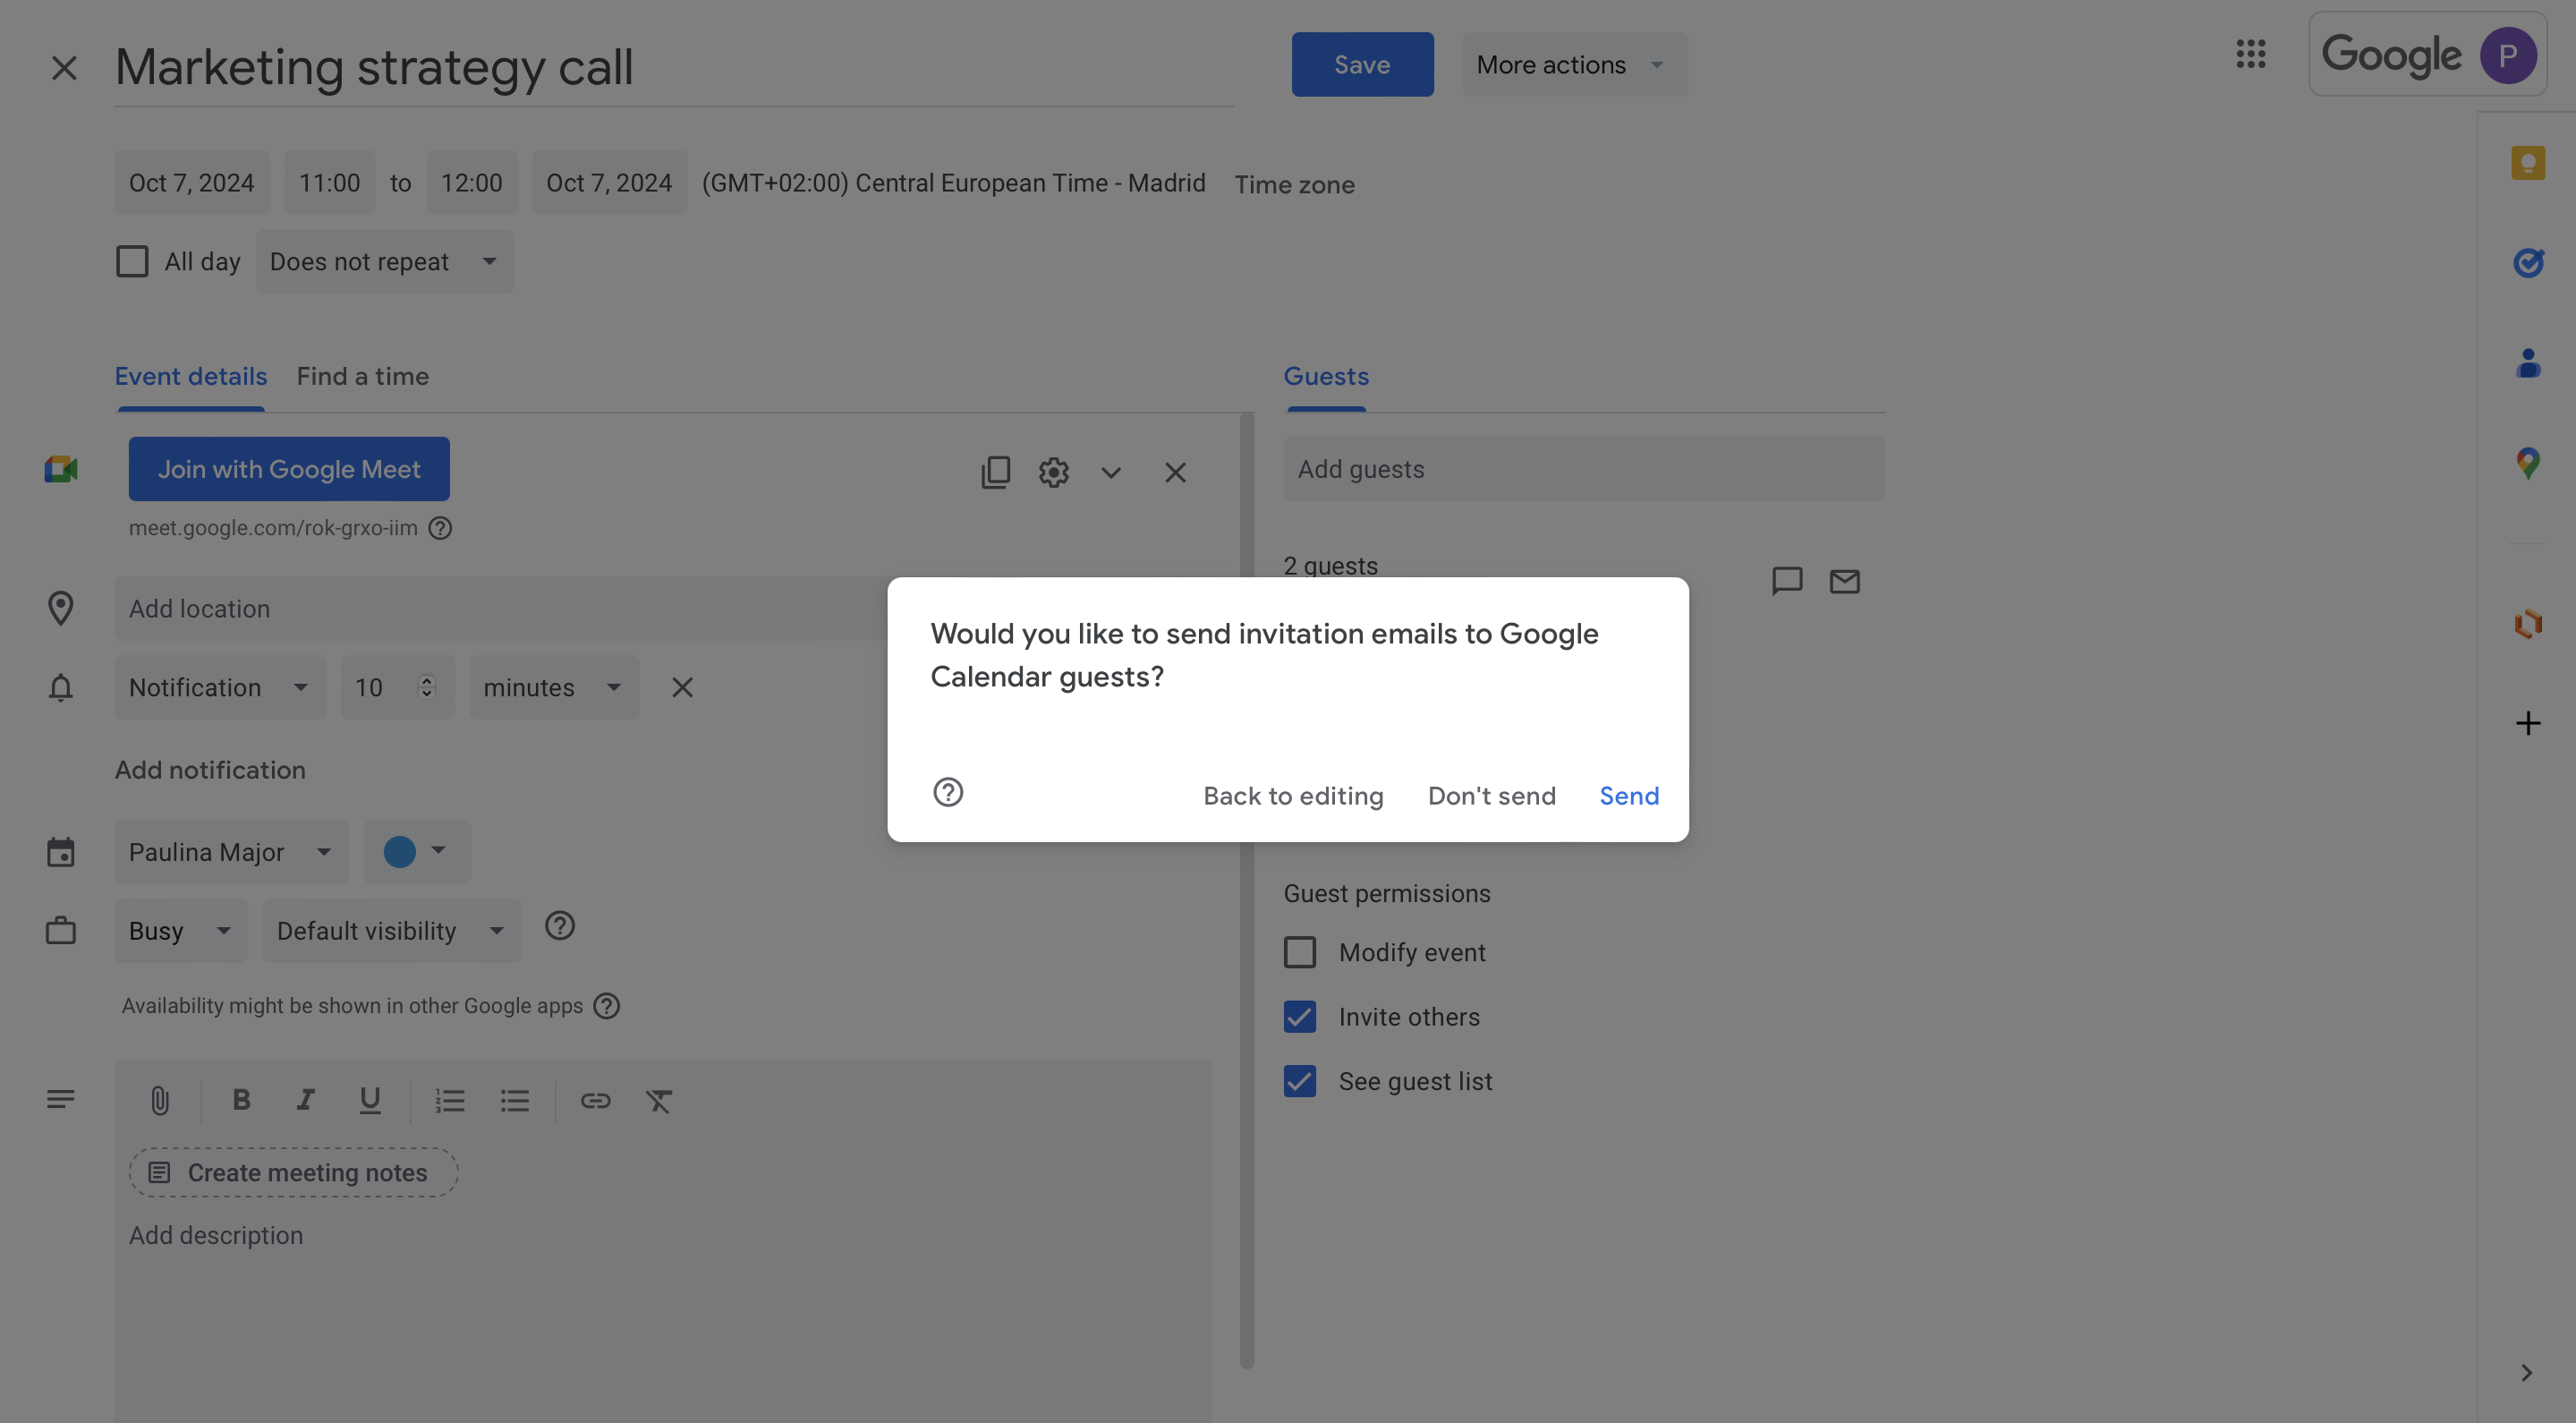
Step 4: Send the invitation
Once you’ve added your guests, click Save. Google Calendar will ask if you want to send email invitations to your guests. Click Send to notify them.
Step 5: Track guest responses
After the invitations are sent, you can track RSVPs. Google Calendar will automatically update you as guests accept or decline the invite.
Another easy way to share your calendar event is by sending an invitation through Gmail. Here’s how you can do it:
Step 1: Open the event on your calendar
Click on the event you want to share from your Google Calendar.
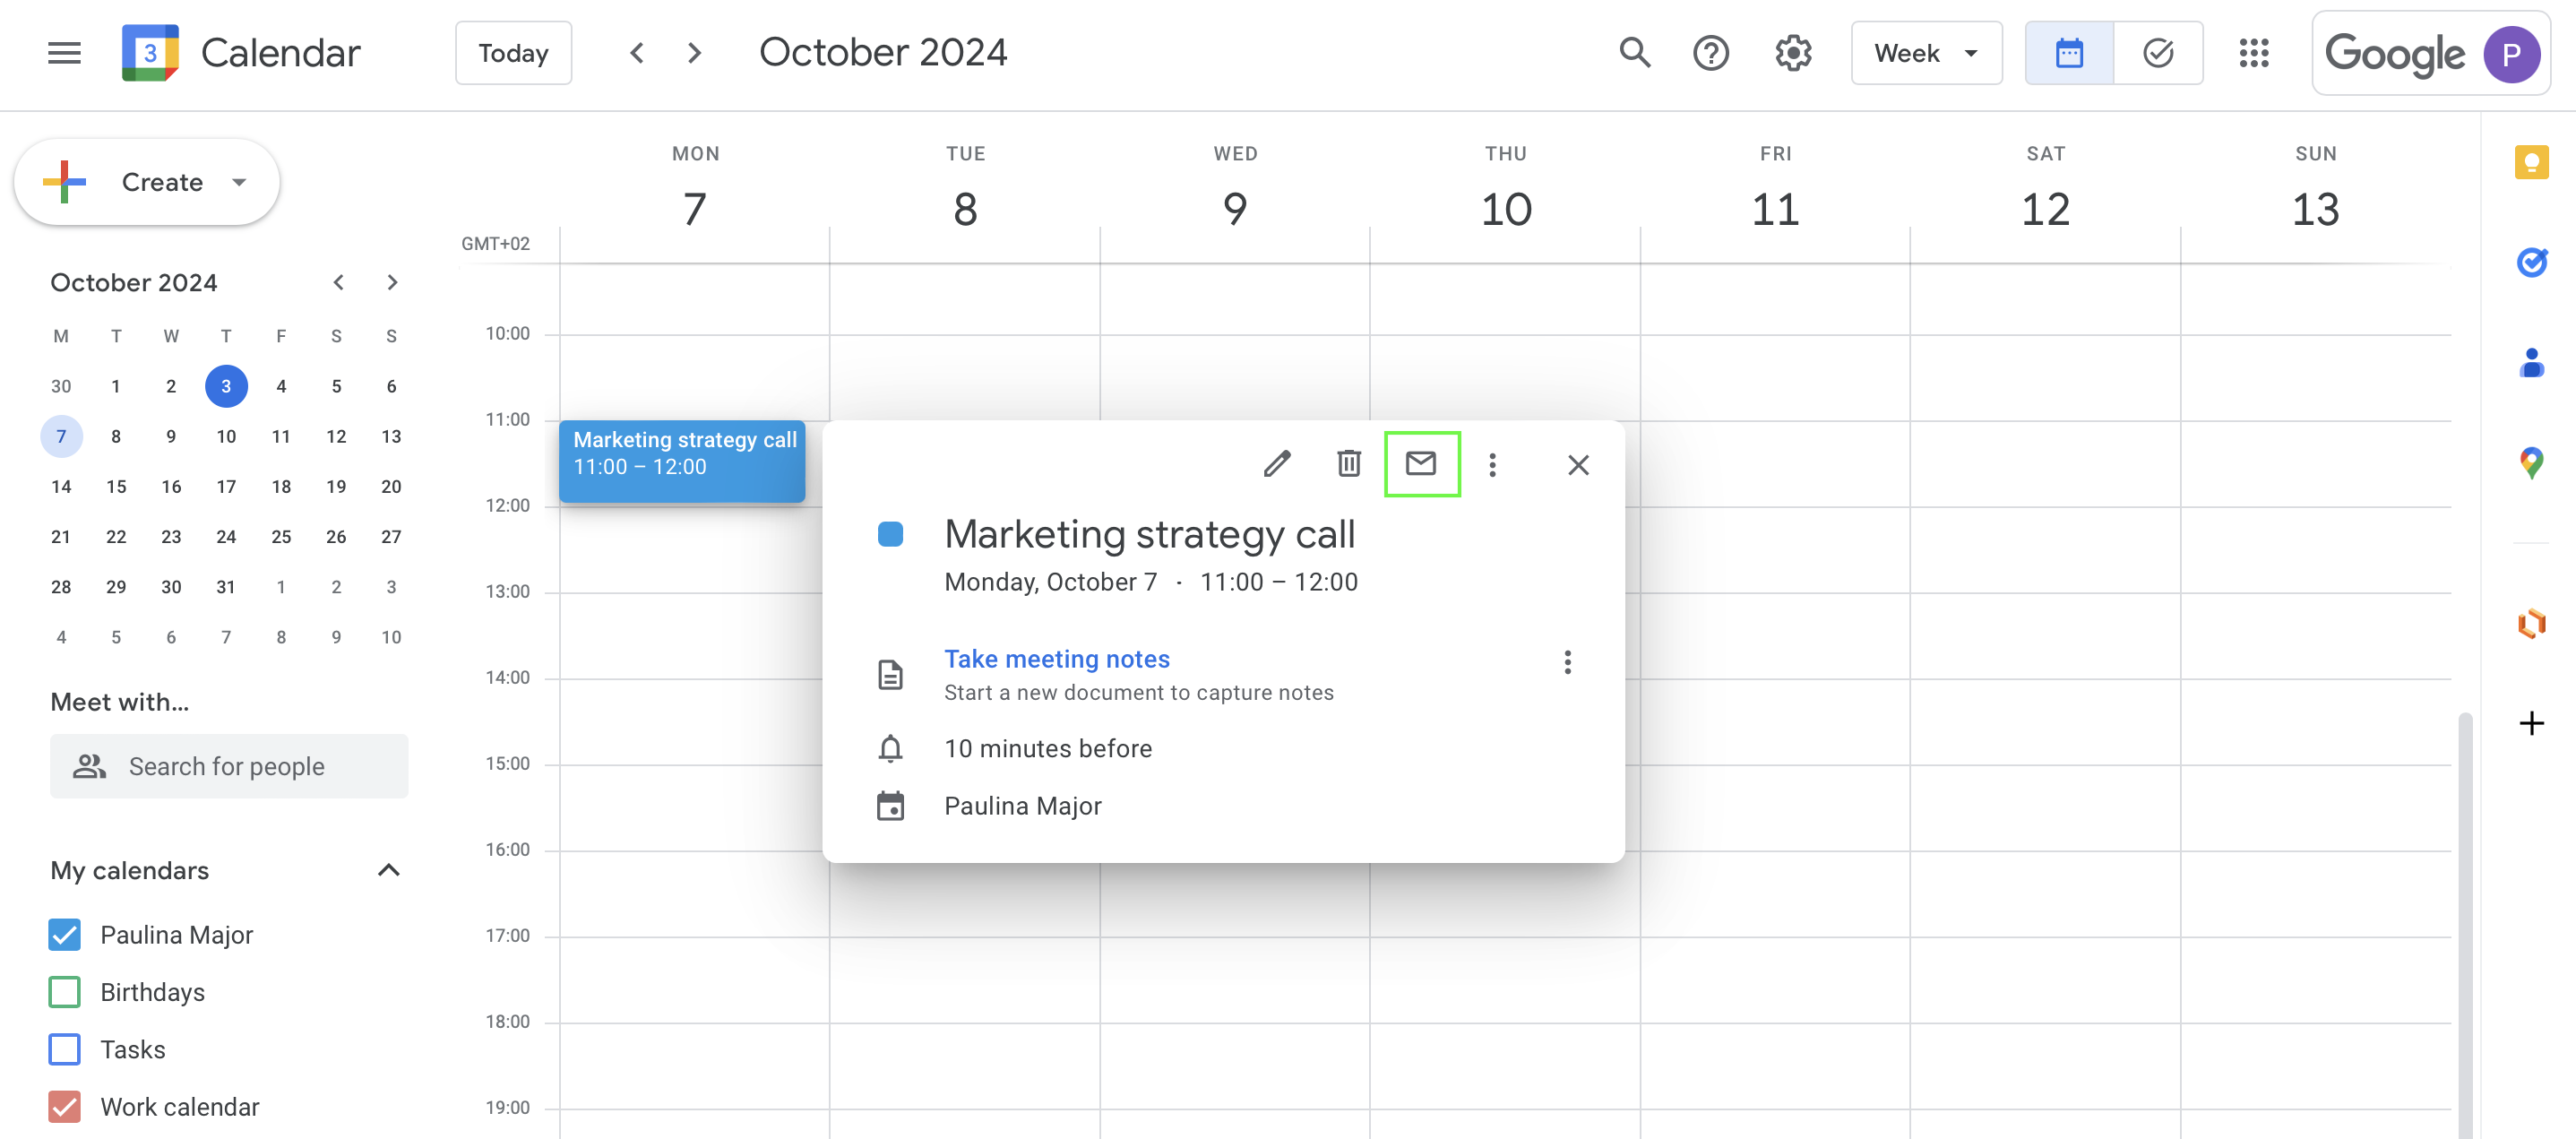
Step 2: Click the email icon
Look for the email icon in the event pop-up window and click it. This will open a new Gmail message.
Step 3: Enter the recipient’s email address and add your message
In the new email, add the recipient’s email address in the To field. Also, fill out the subject line and write a short meeting invitation message if needed.
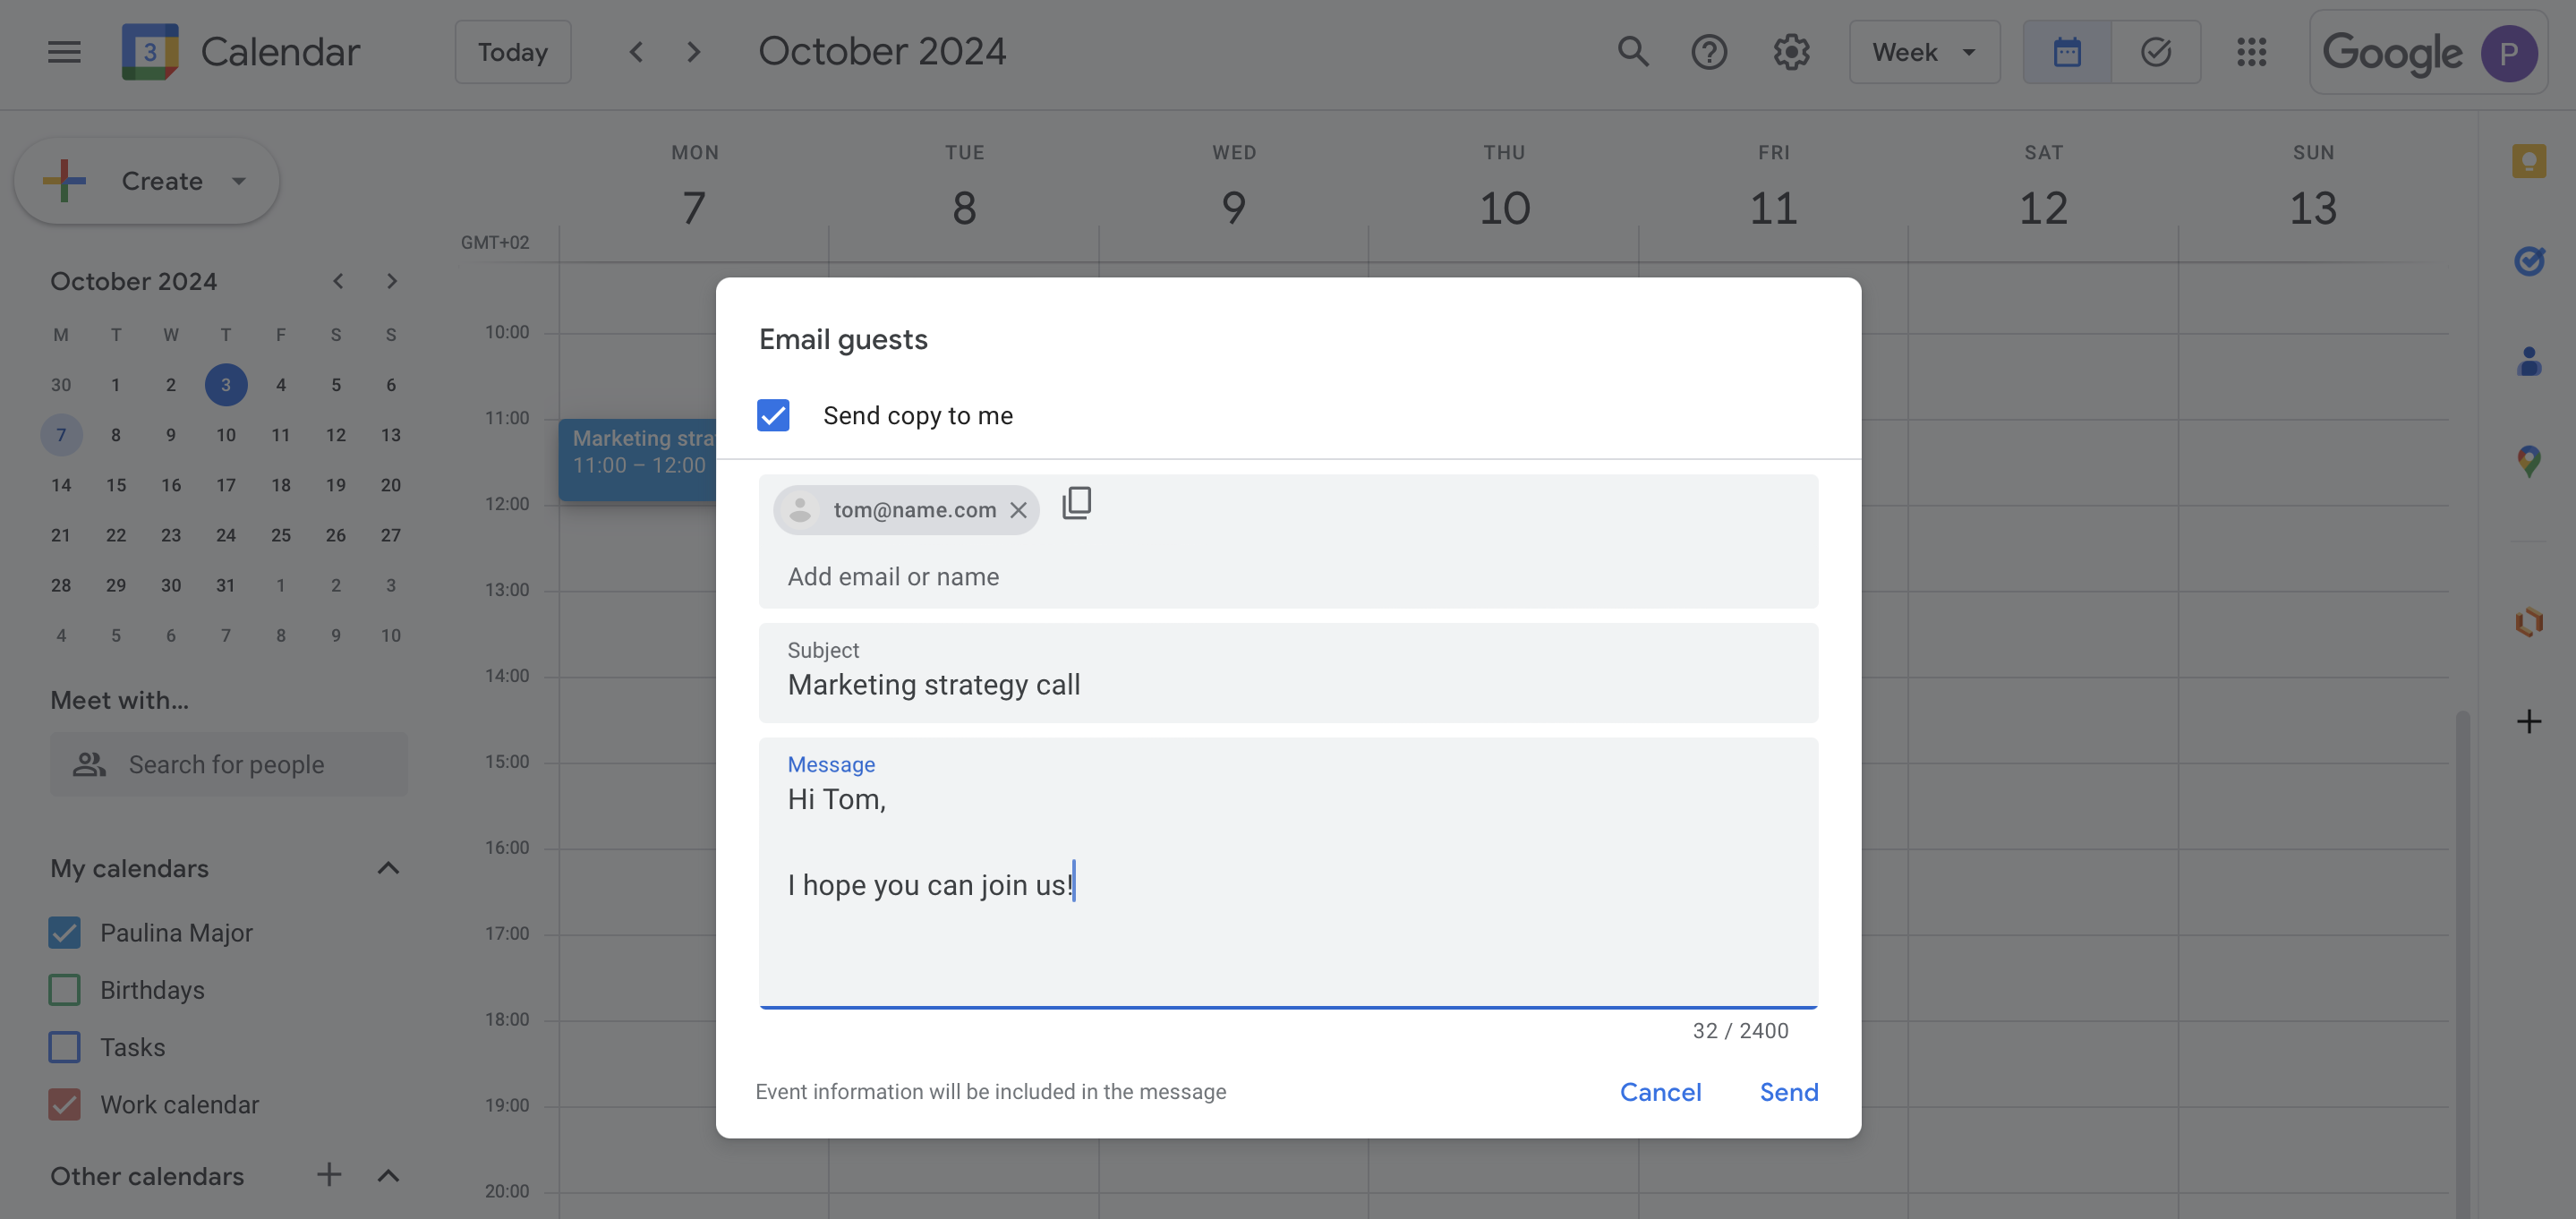
Step 4: Click Send
Once you're ready, click Send to share the event.
A third way is share your calendar event is by generating a shareable HTML link. Here’s how to do it:
Step 1: Open the event you want to share
Click on the event in your calendar to open the details.
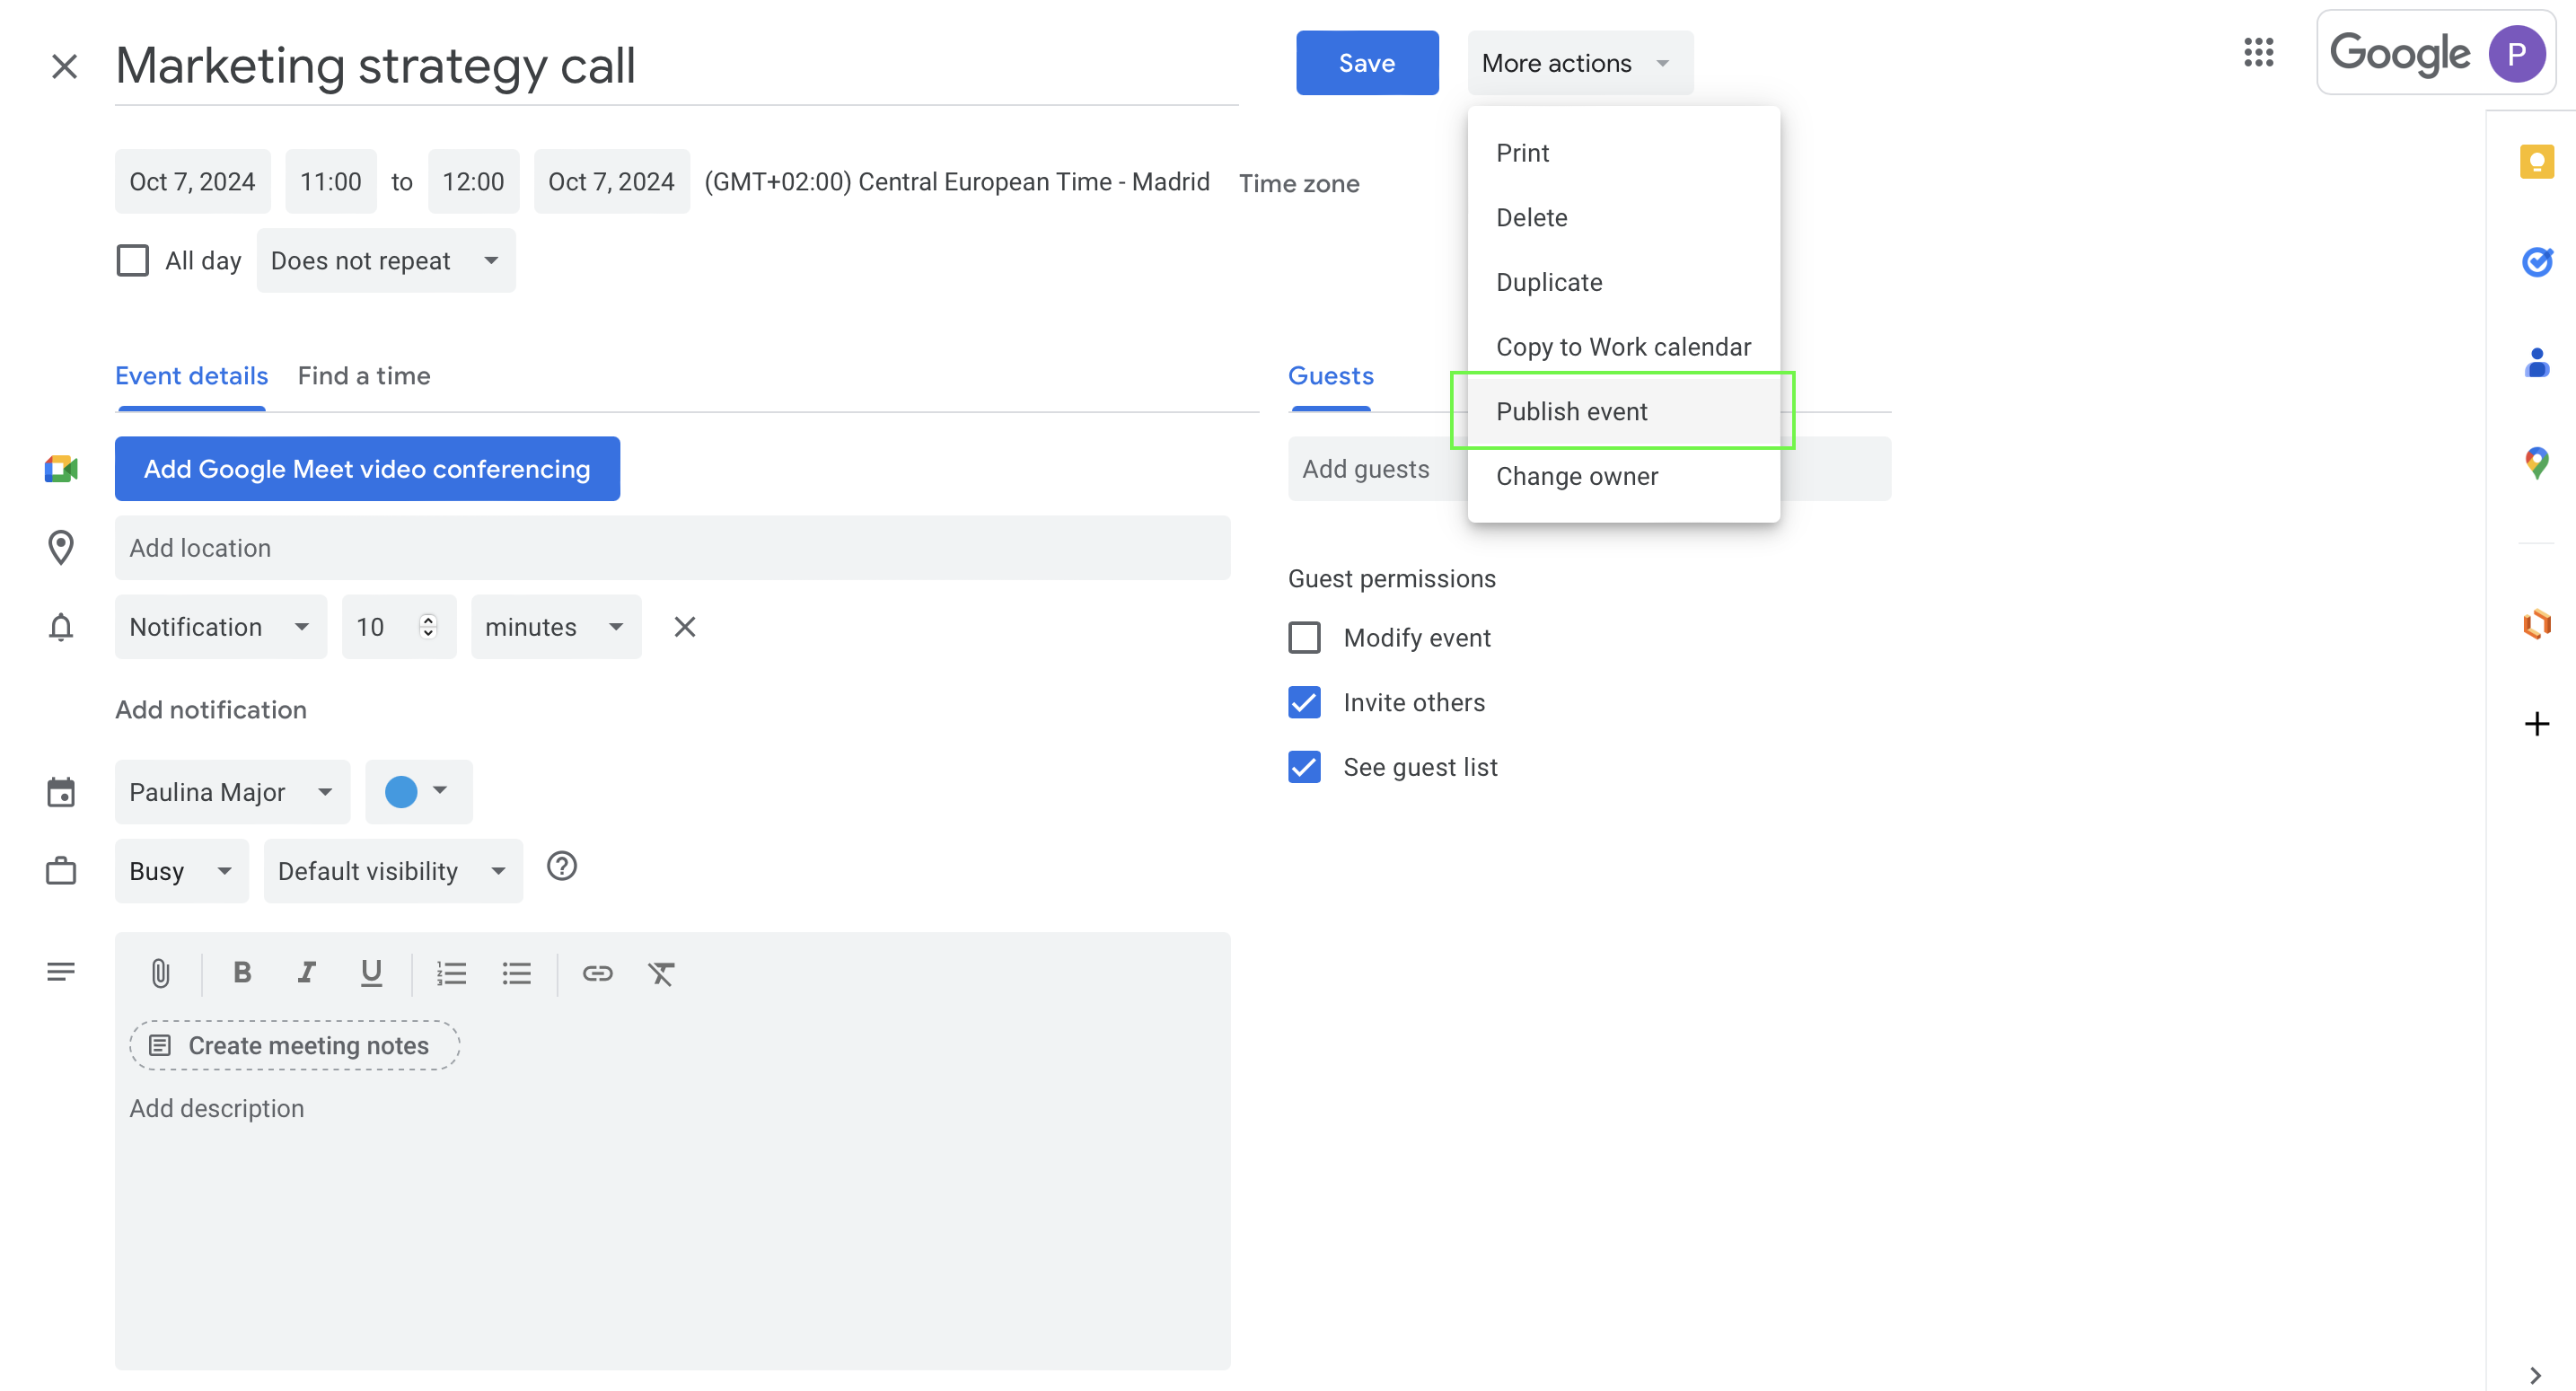
Step 2: Click on “More options”
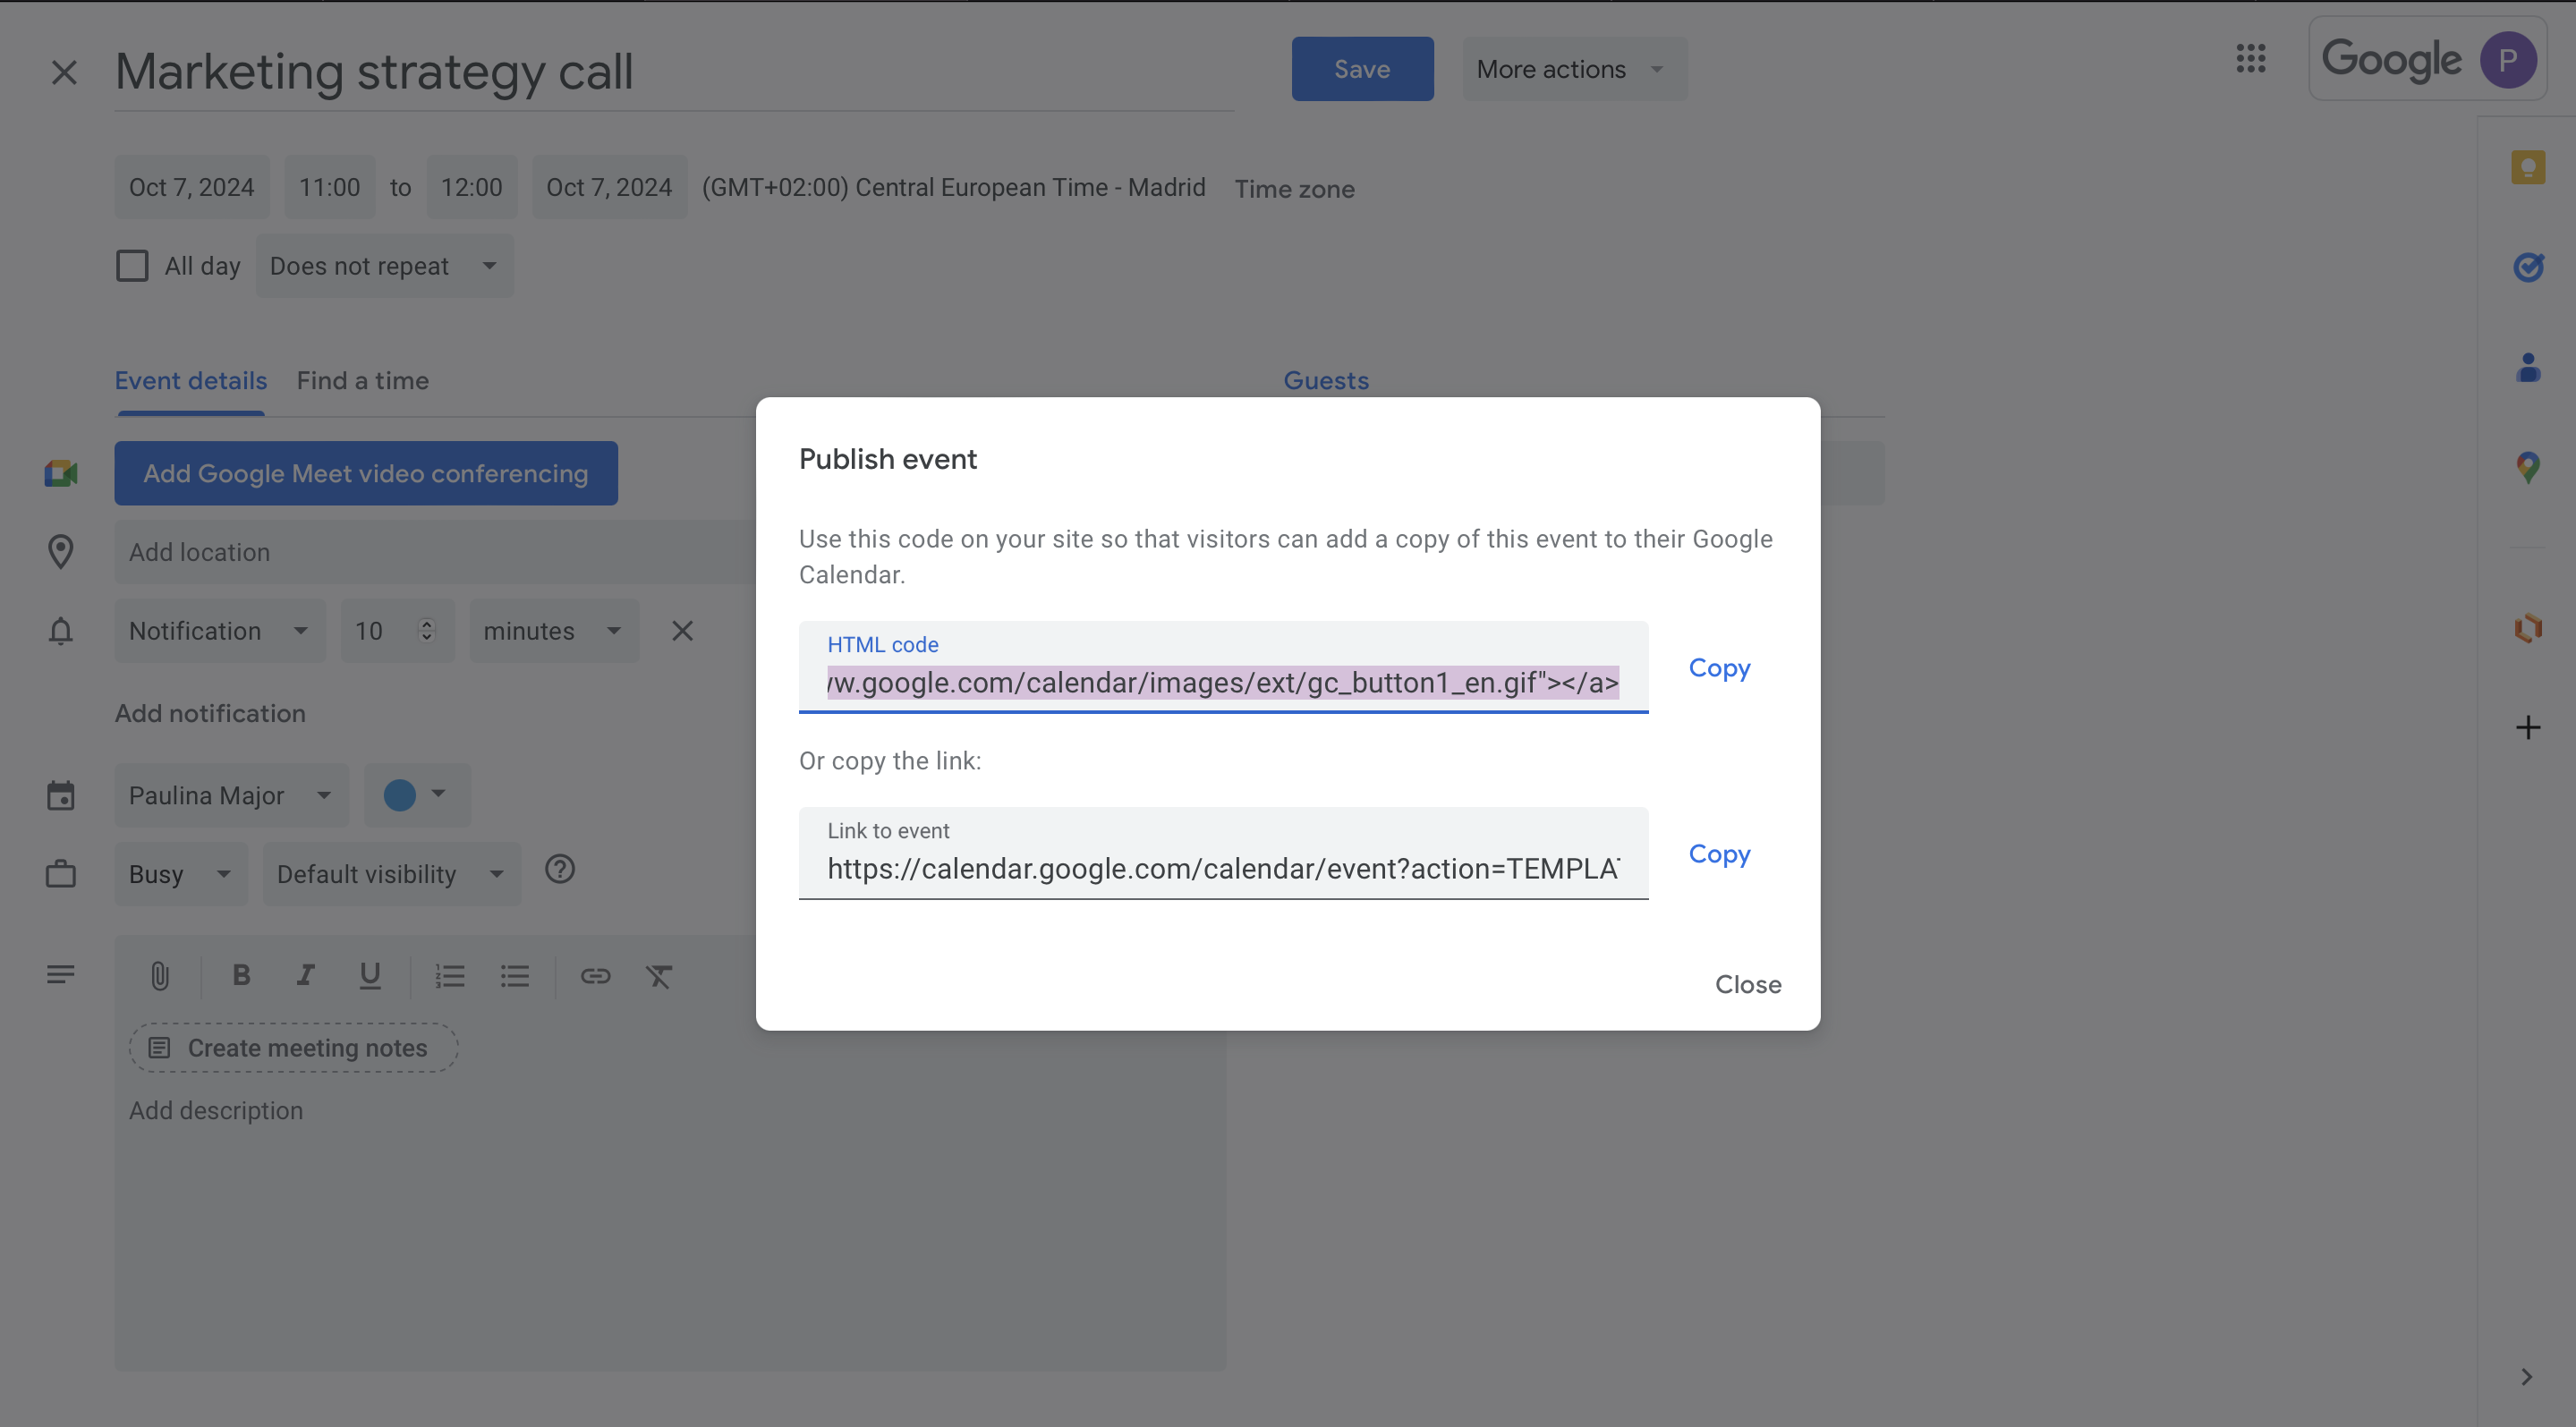
In the event pop-up window, click on the More options button (three vertical dots) and choose Publish event from the dropdown menu.
Step 3: Copy the event link
Once the event is published, you’ll see a generated link. Copy the Event URL or the HTML code.
Step 4: Share the link
You can now share the scheduling link by pasting it into an email, a message, or even embedding it on a website. Anyone with the link can view and add the event to their own calendar.
|
💡 Bonus Google Calendar Tip: This option works great if you want to share an event publicly, like a webinar or open meeting, without sending personal invitations. |
Sometimes, sharing individual events is enough—like when you need to invite someone to a one-time meeting or event.
However, sharing your entire calendar can be more efficient when you have ongoing projects, recurring meetings, or need full transparency for work, clients, or family members. Individual events are great for one-off scheduling, but they can become time-consuming to manage if you’re coordinating with the same people regularly.
Here are four different ways you can share your calendar:
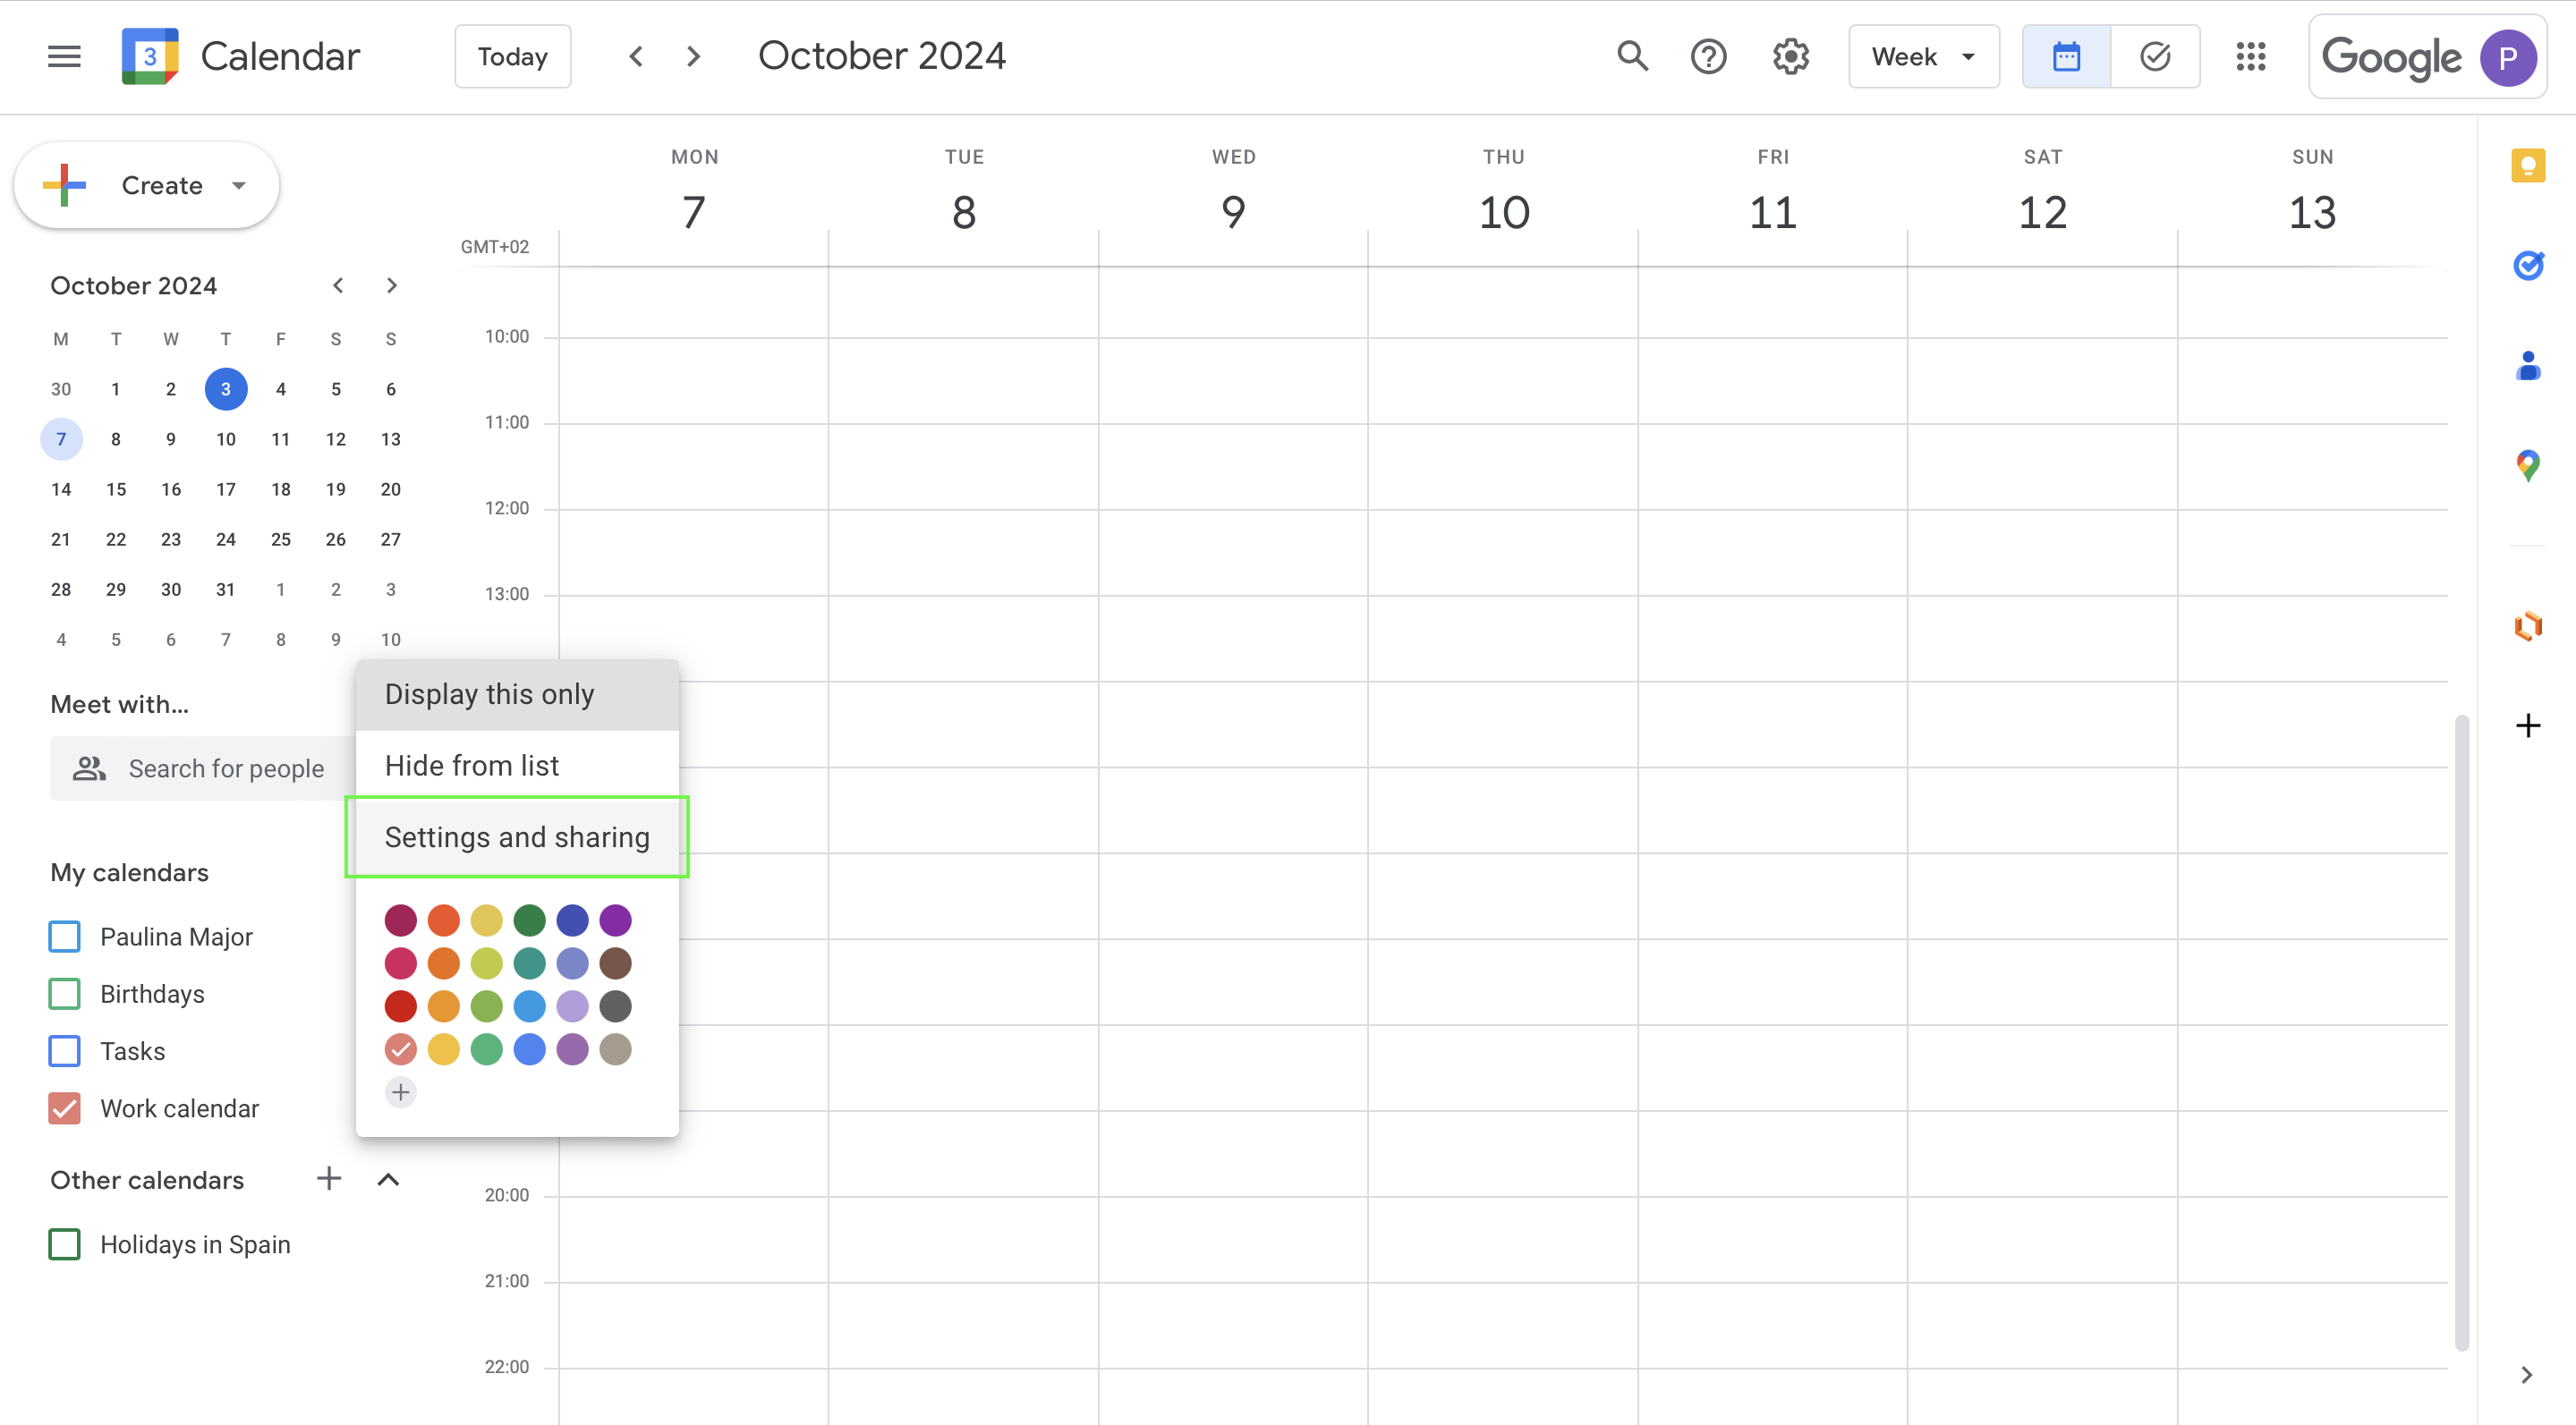
Step 1: Open Google Calendar, and click on the three dots next to the calendar you want to share.
Step 2: Select Settings and Sharing.
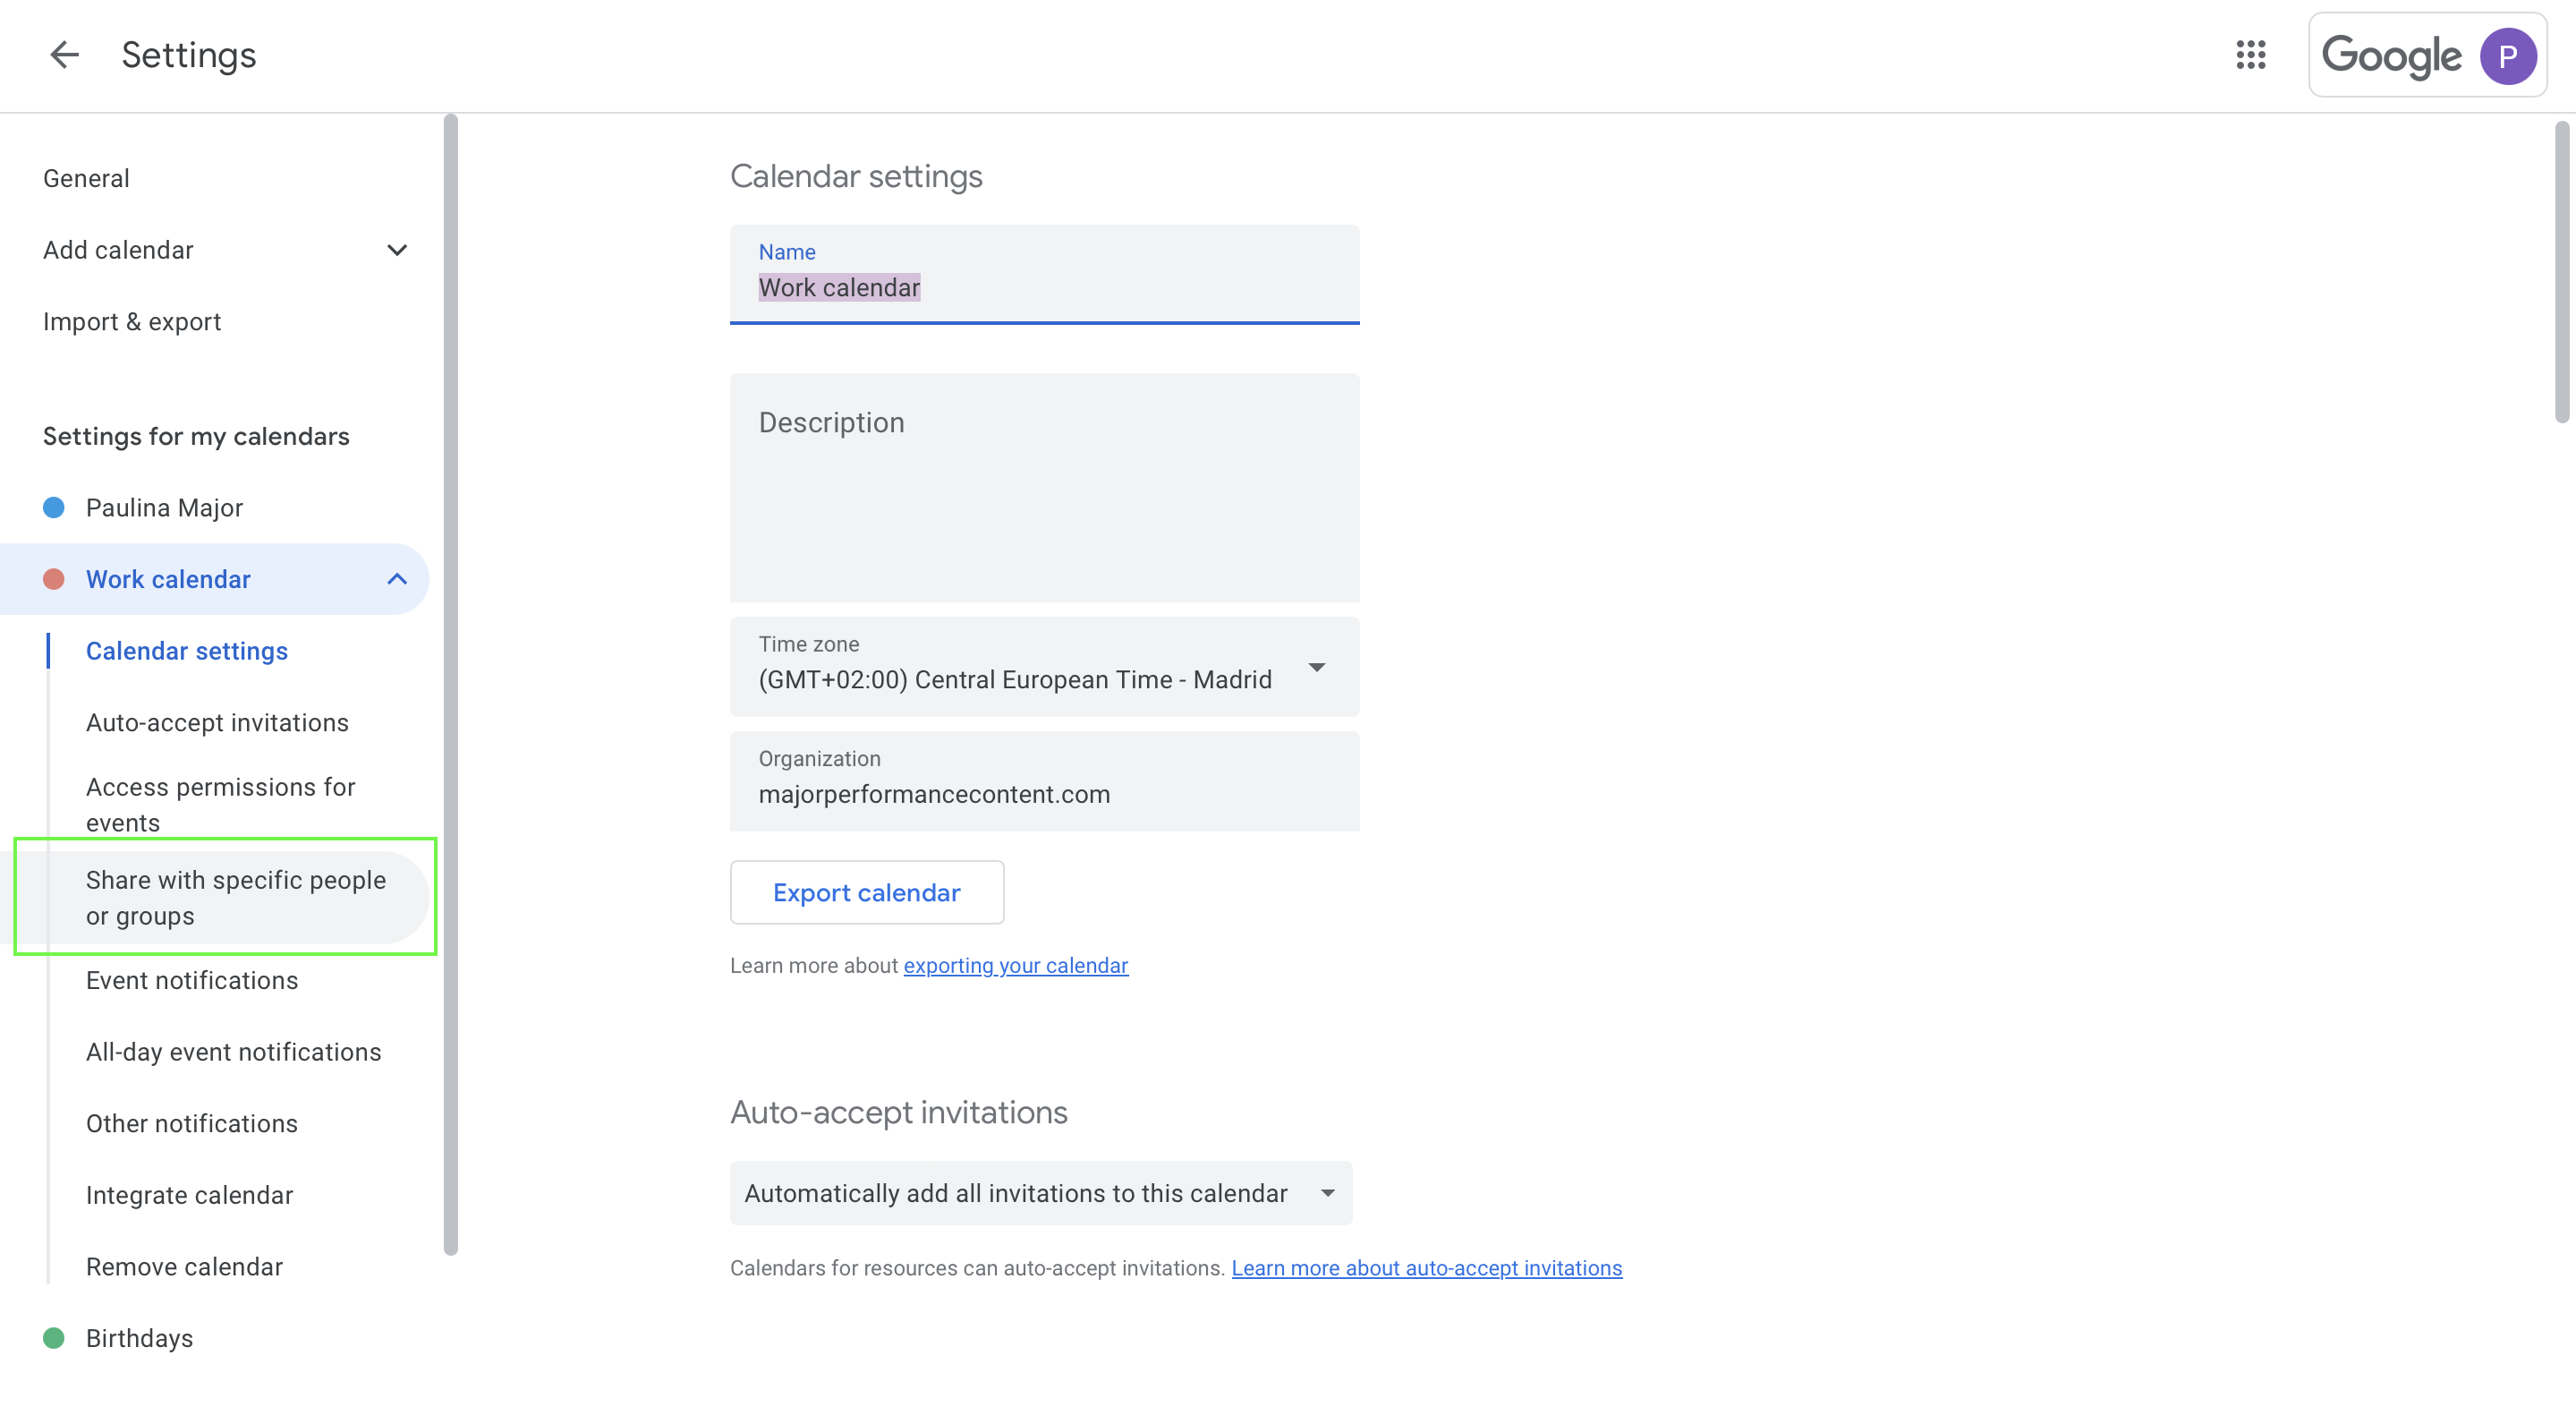
Step 3: From the Settings and Sharing page, on the left side navigation, click Share with specific people, then click Add people and enter their email address.
💡 Want to stop sharing your calendar? Follow the same steps to remove access.
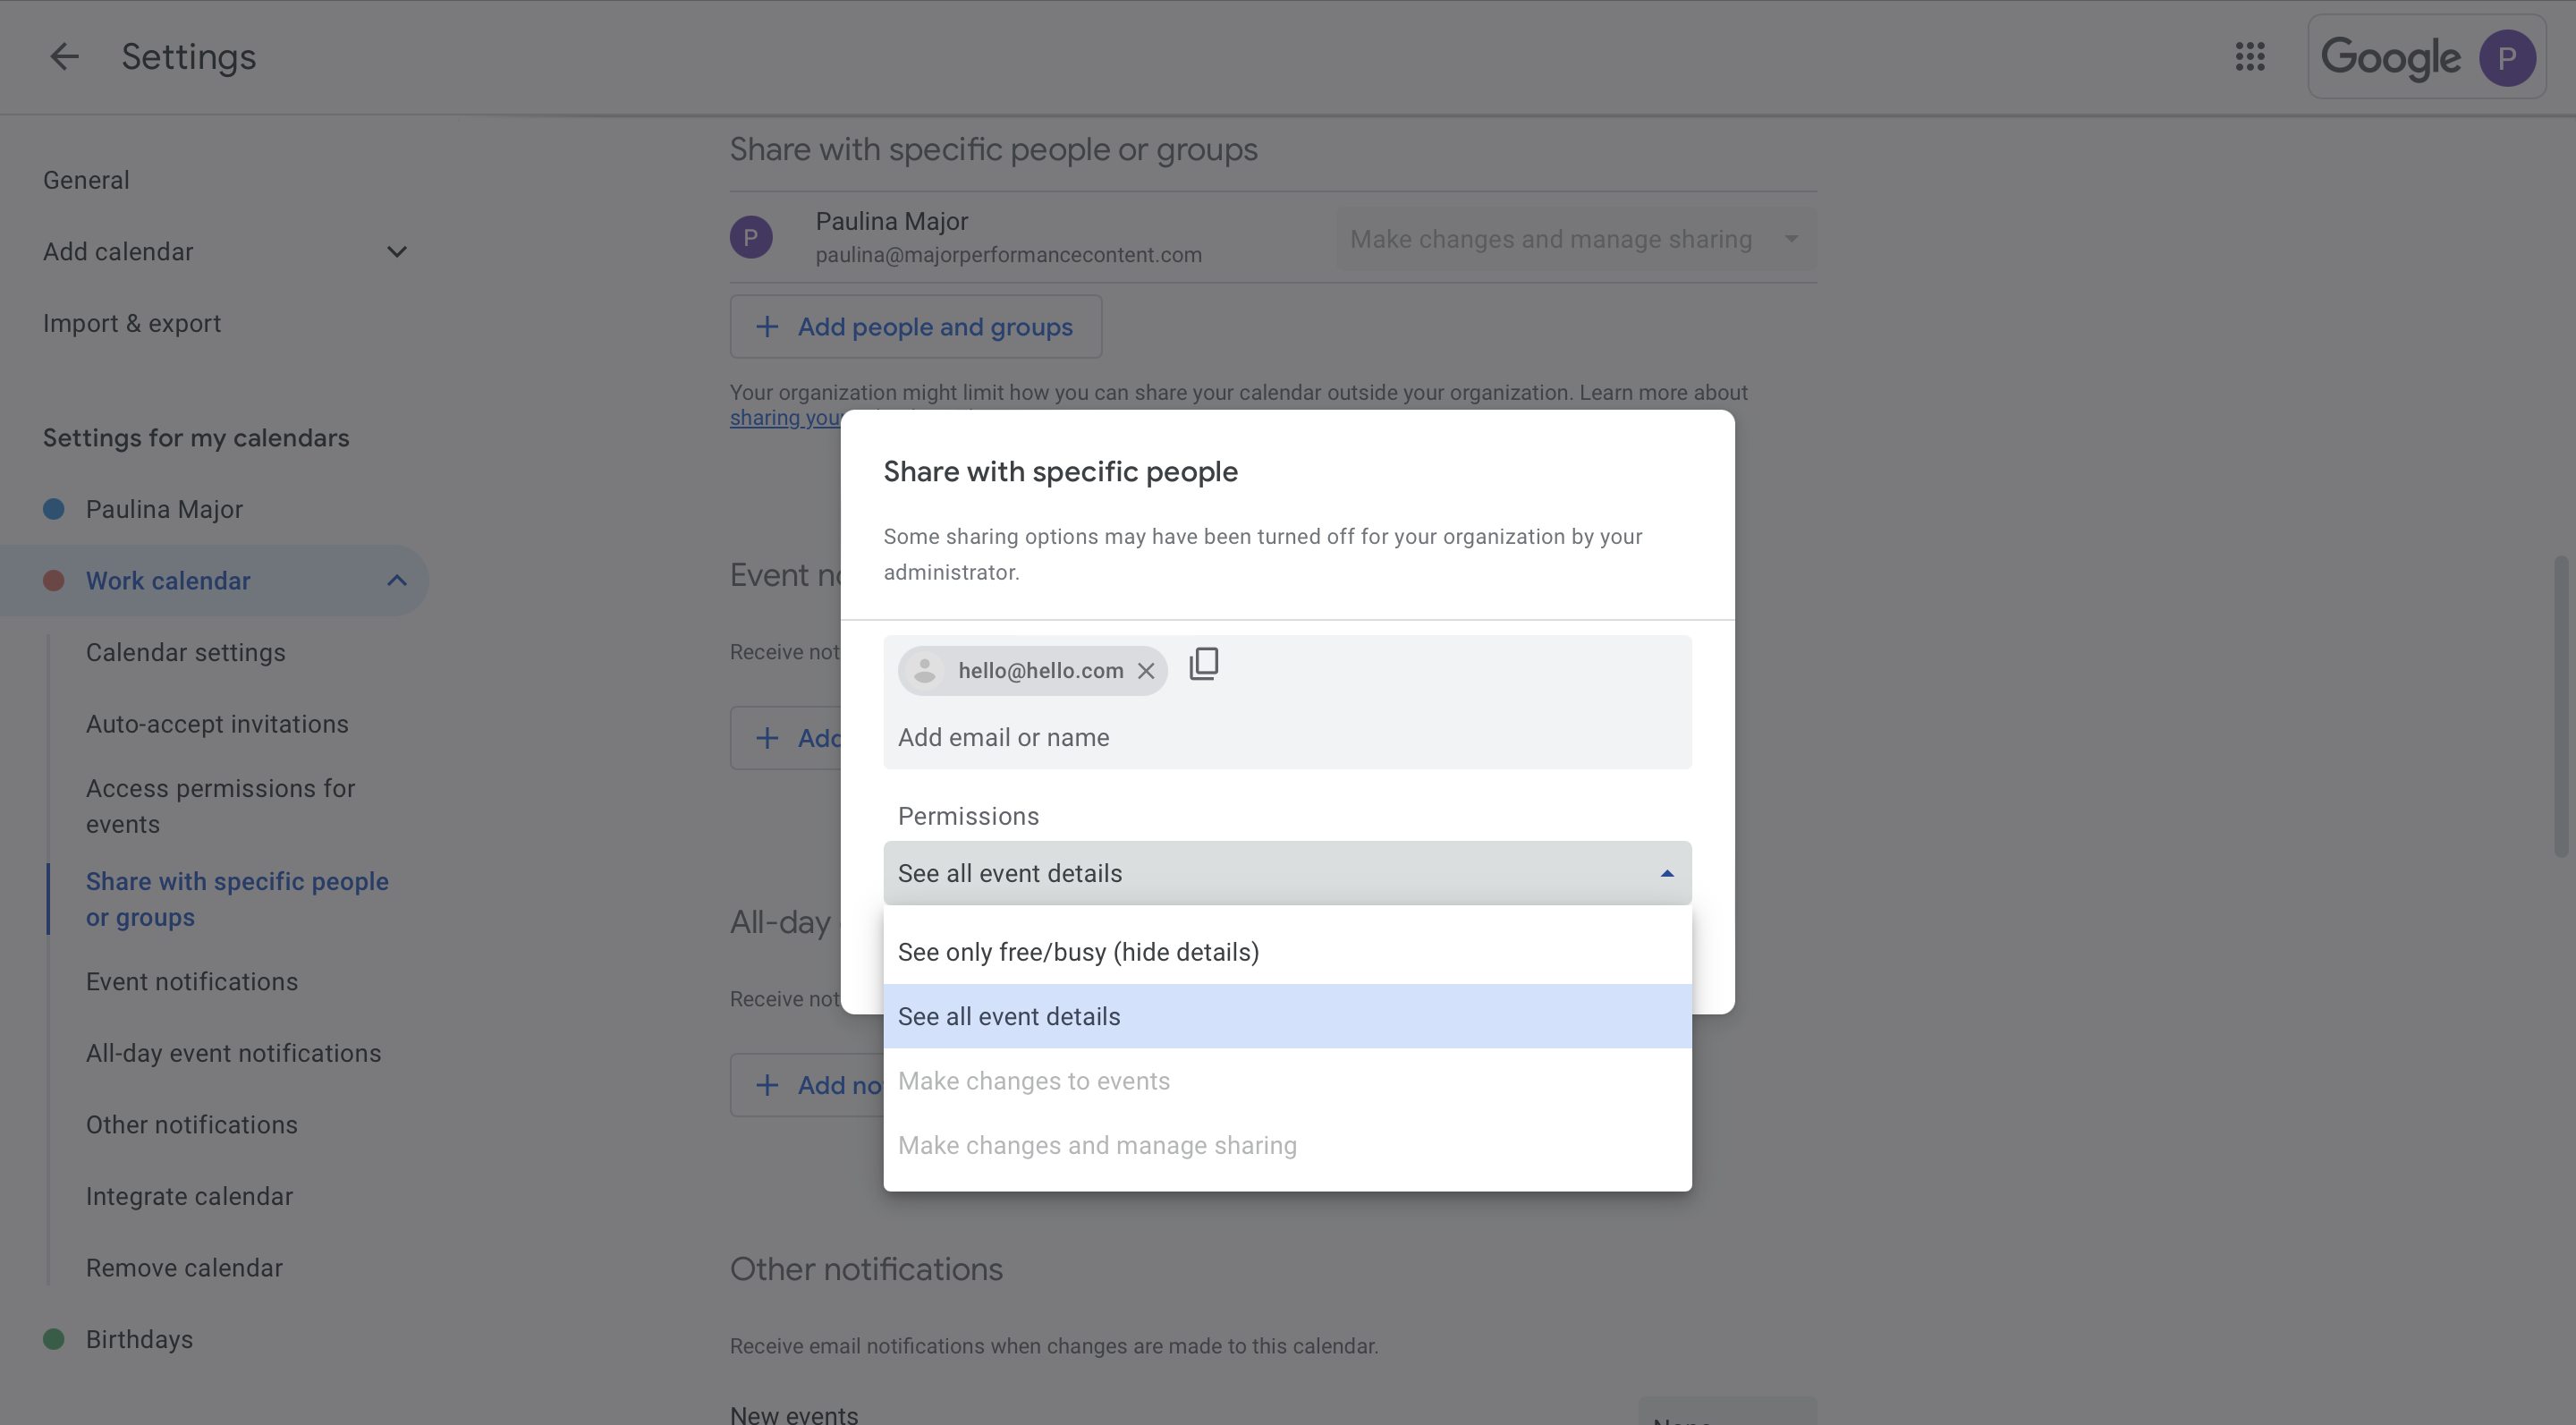
Step 4: Choose the permission level. From here, you can access permissions around visibility:
- See only free busy (hide details): Recipients can only see access your calendar events and see only free/busy. No details shared.
- See all event details: Recipients can access all of your calendar events plus see all event details (title, description, attendees, etc).
- Make changes to events: Recipients can edit event details.
- Make changes and manage sharing: Recipients can manage the sharing settings of the event itself.
Step 5: Click "Send" to share the calendar. Keep in mind that the recipient must also add your calendar to theirs to view it.
A shared calendar is perfect for collaborative efforts like managing business teams or organizing family activities. For example, businesses might use a joint Marketing Calendar for project deadlines, while families can create a shared calendar for soccer practices or school events.
The process of creating a joint calendar is very similar to creating a brand-new calendar. If you need visual instructions, simply refer to the first section of this guide.
The only difference is that after creating the new calendar—whether it's for a specific team at work (e.g., "Marketing Team") or for your family (e.g., "Family Schedule")—you'll need to go to the calendar’s settings and click Share with specific people or groups.
Then, add the email addresses of your collaborators and choose their permission levels. Now, everyone added can view and edit the calendar, making it easy to collaborate.
Need to keep track of someone else’s schedule? Google Calendar lets you add someone else’s calendar to yours so you can view their availability.
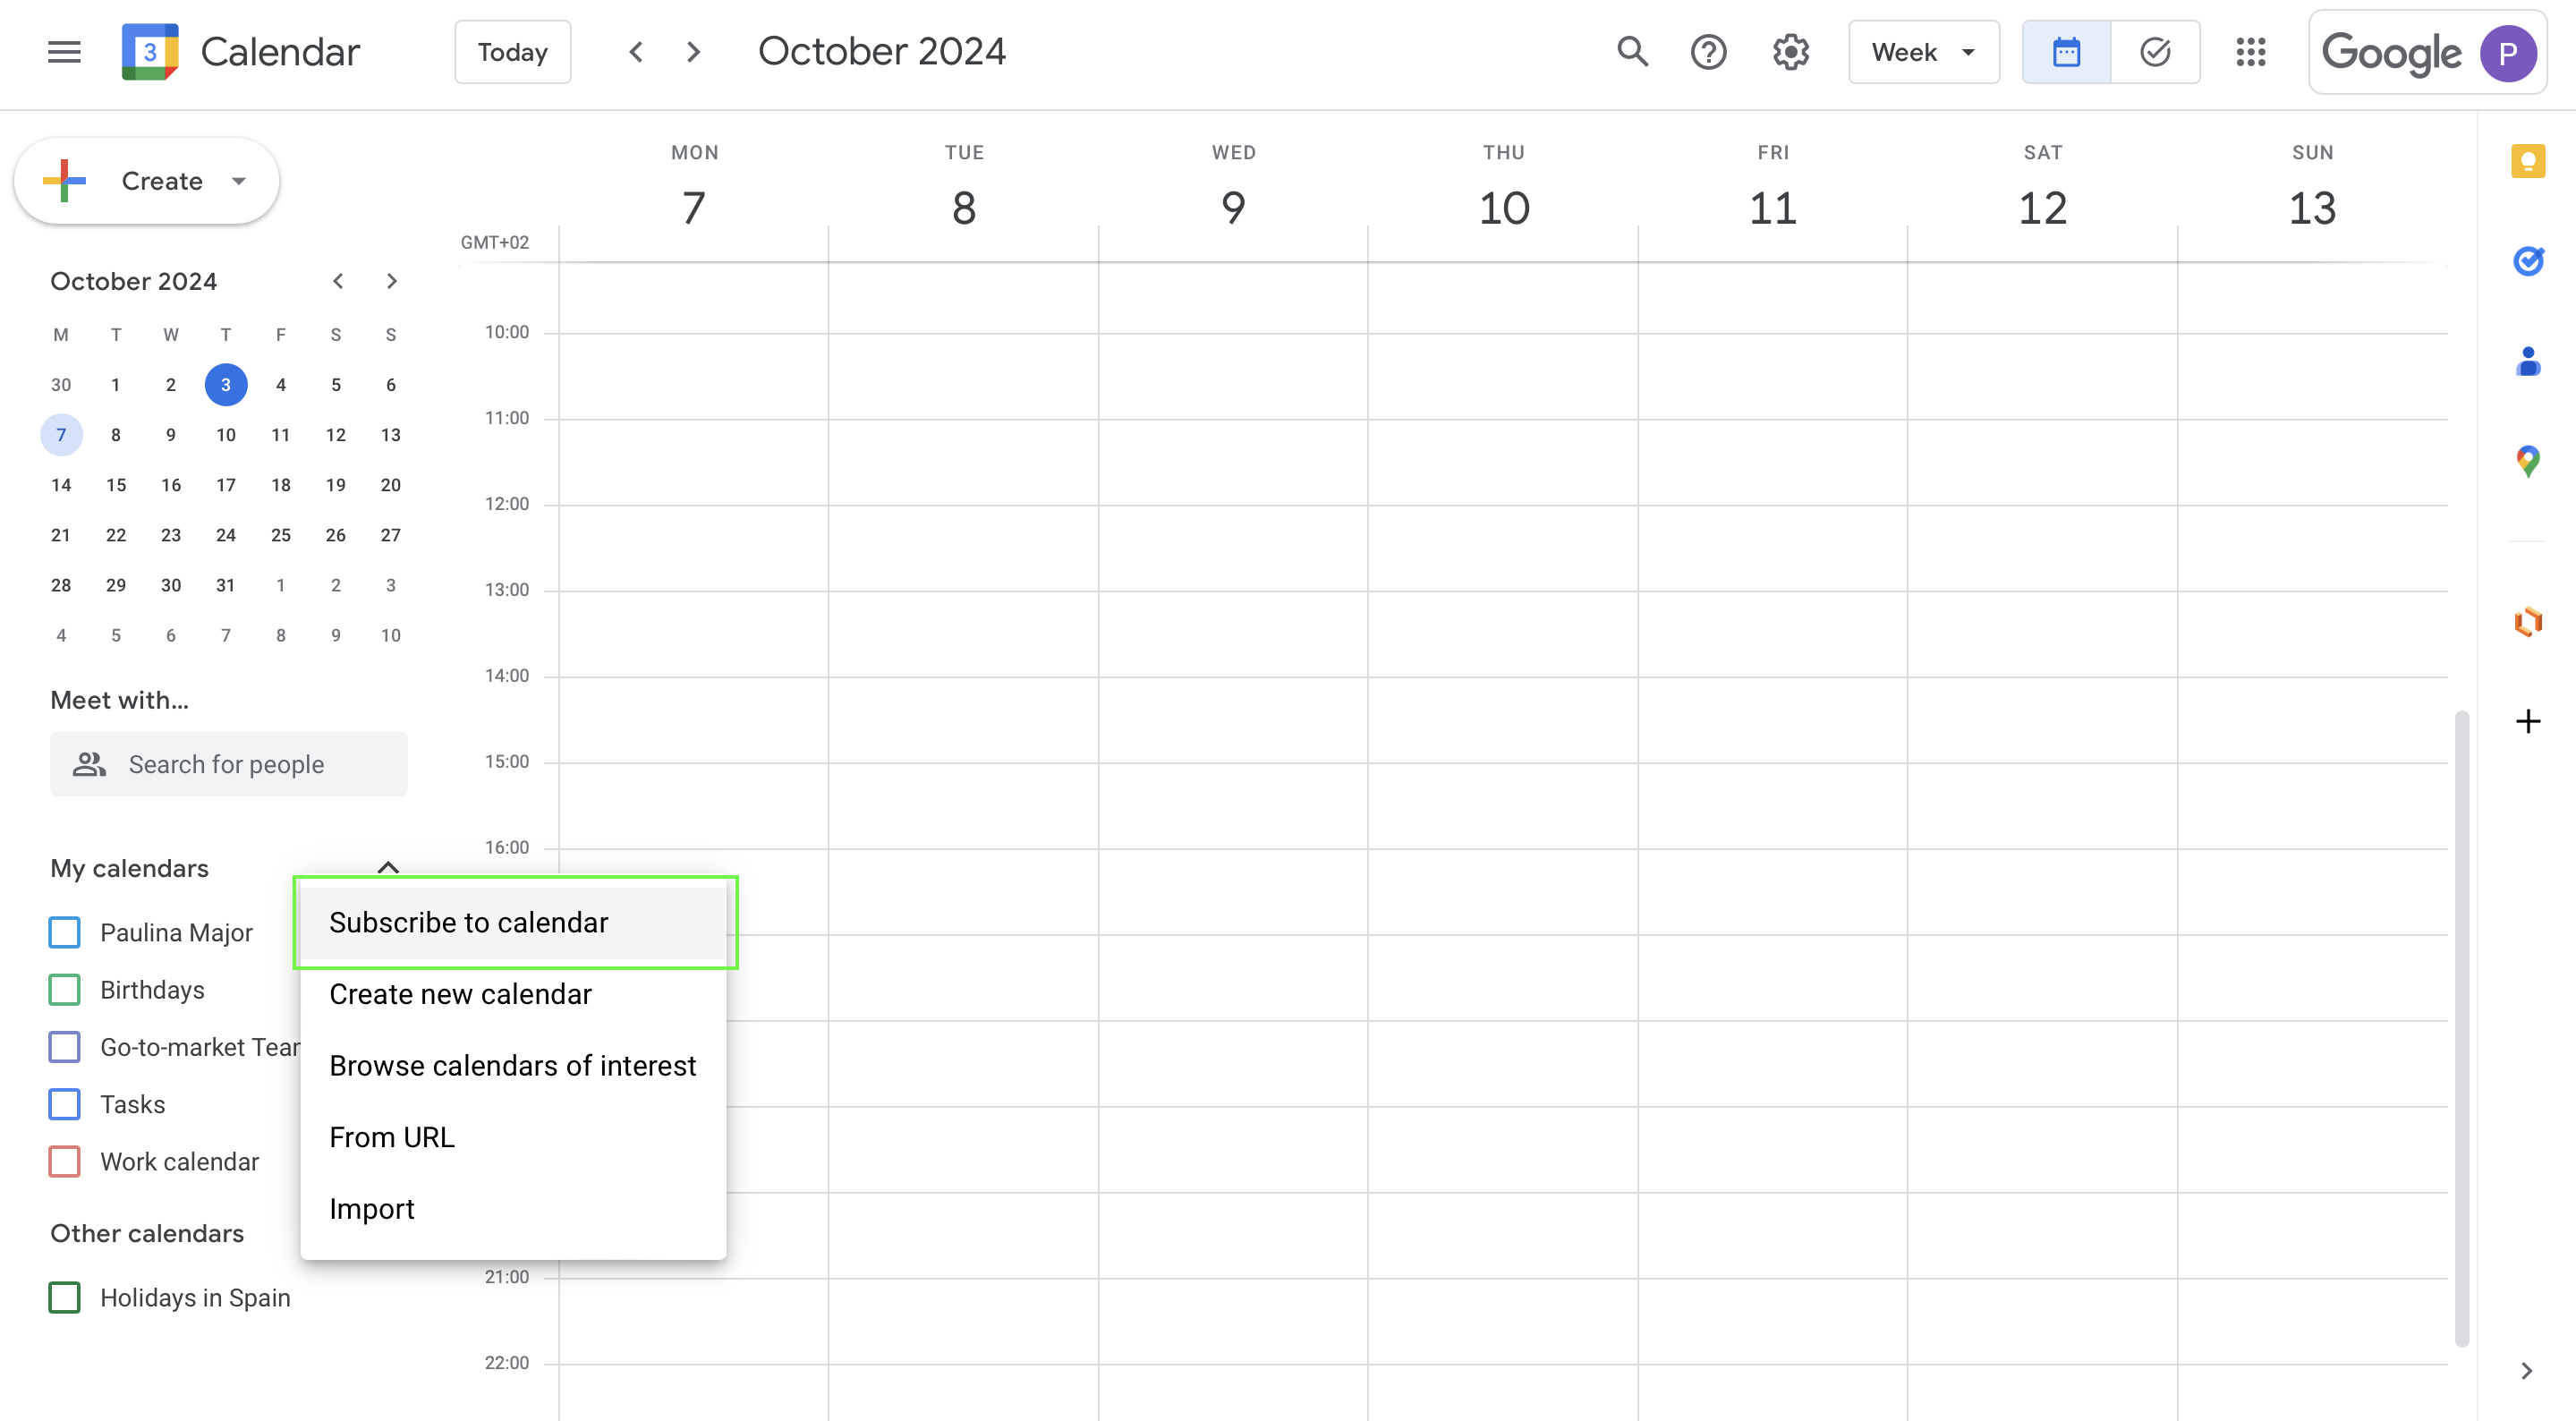
Step 1: Open Google Calendar and, in the Other Calendars section on the left, click the + sign.
Step 2: Select Subscribe to Calendar.
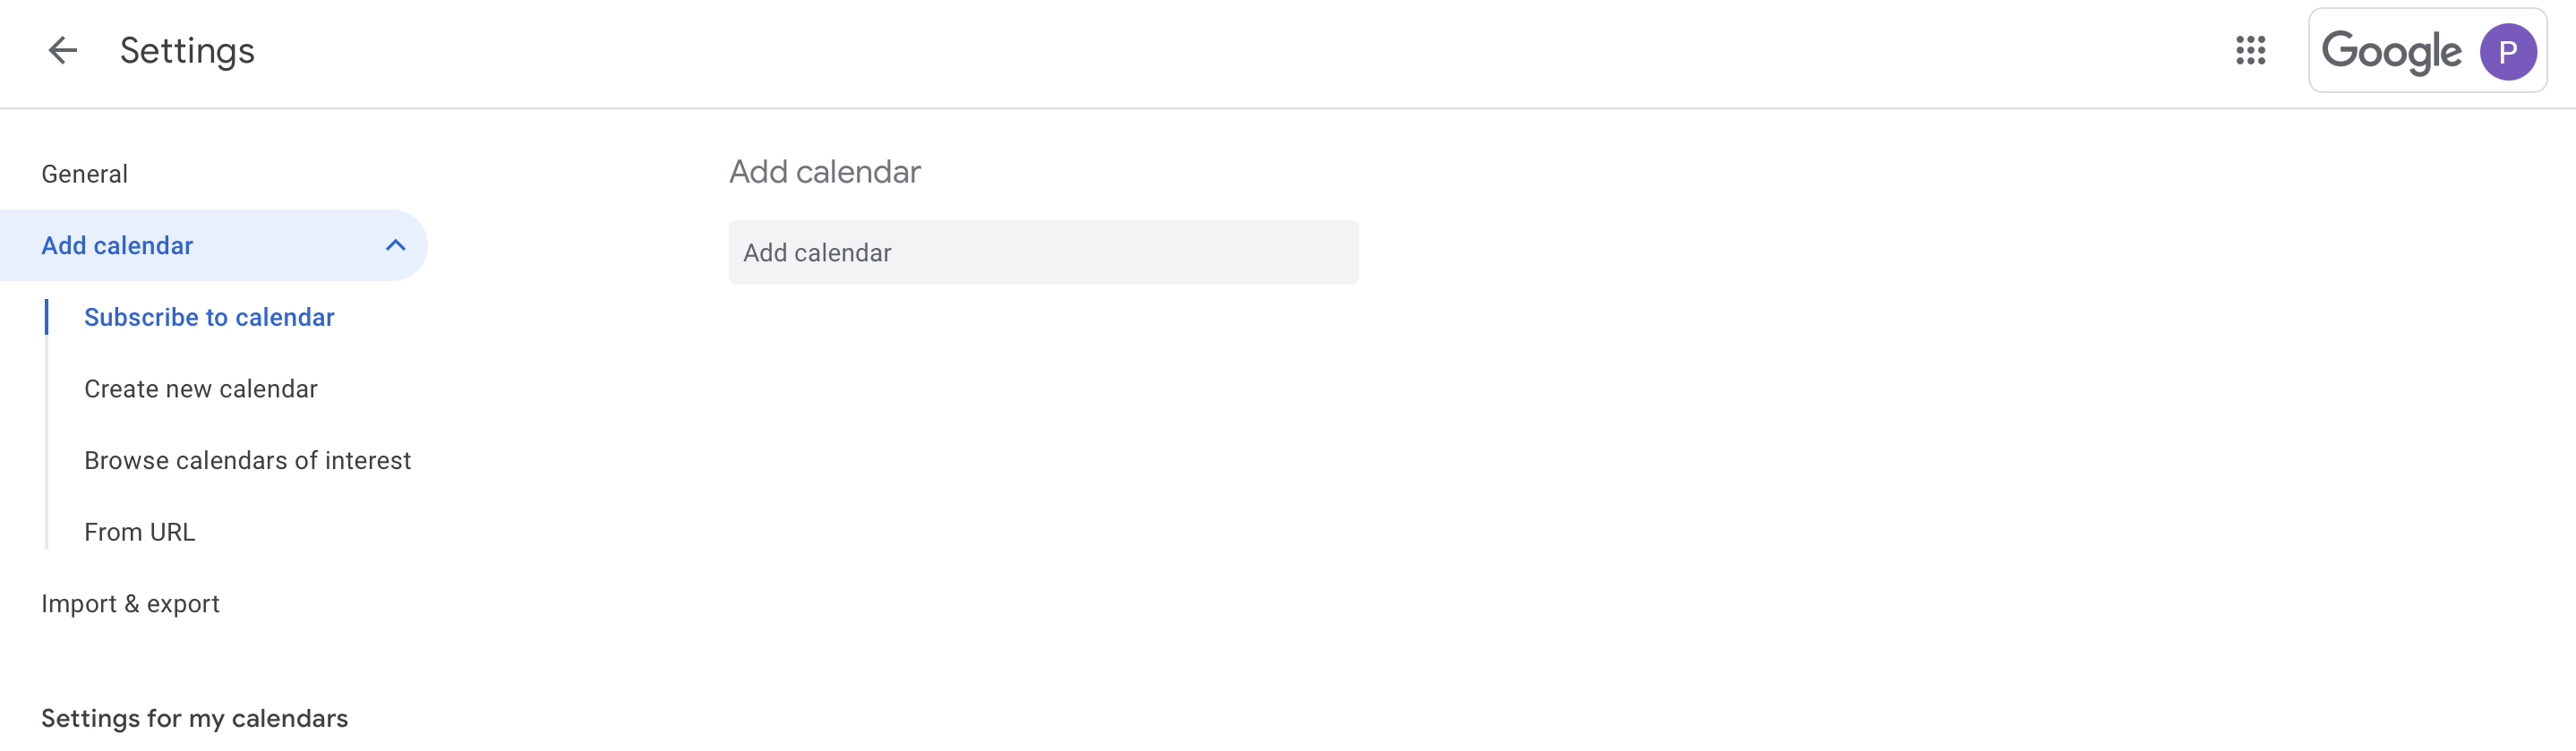
Step 3: Enter the person’s email address, and if they’ve shared their calendar with you, it’ll appear in your list.
Step 4: You can now view their calendar alongside yours to easily compare schedules.
This is a great option for managers, colleagues, or family members who need to stay in sync with each other’s availability.
If you’re a business owner who needs to schedule appointments with clients or team members, integrating Google Calendar with YouCanBookMe is by far the superior option.
YouCanBookMe automates meeting scheduling, allowing your clients, colleagues, team members, or anyone who needs to book a meeting with you to simply select a time from your calendar that suits them best. Appointments are then automatically added to your Google Calendar, with notifications for new bookings, changes, or cancellations.
Moreover, you can create branded booking pages to embed in your website or emails, set appointment durations, and add custom fields for clients. Plus, YouCanBookMe sends automated reminders, so your attendees won’t forget their meeting with you!
So, how do you go about sharing your scheduling link?
Step 1: Create your free YouCanBookMe account.
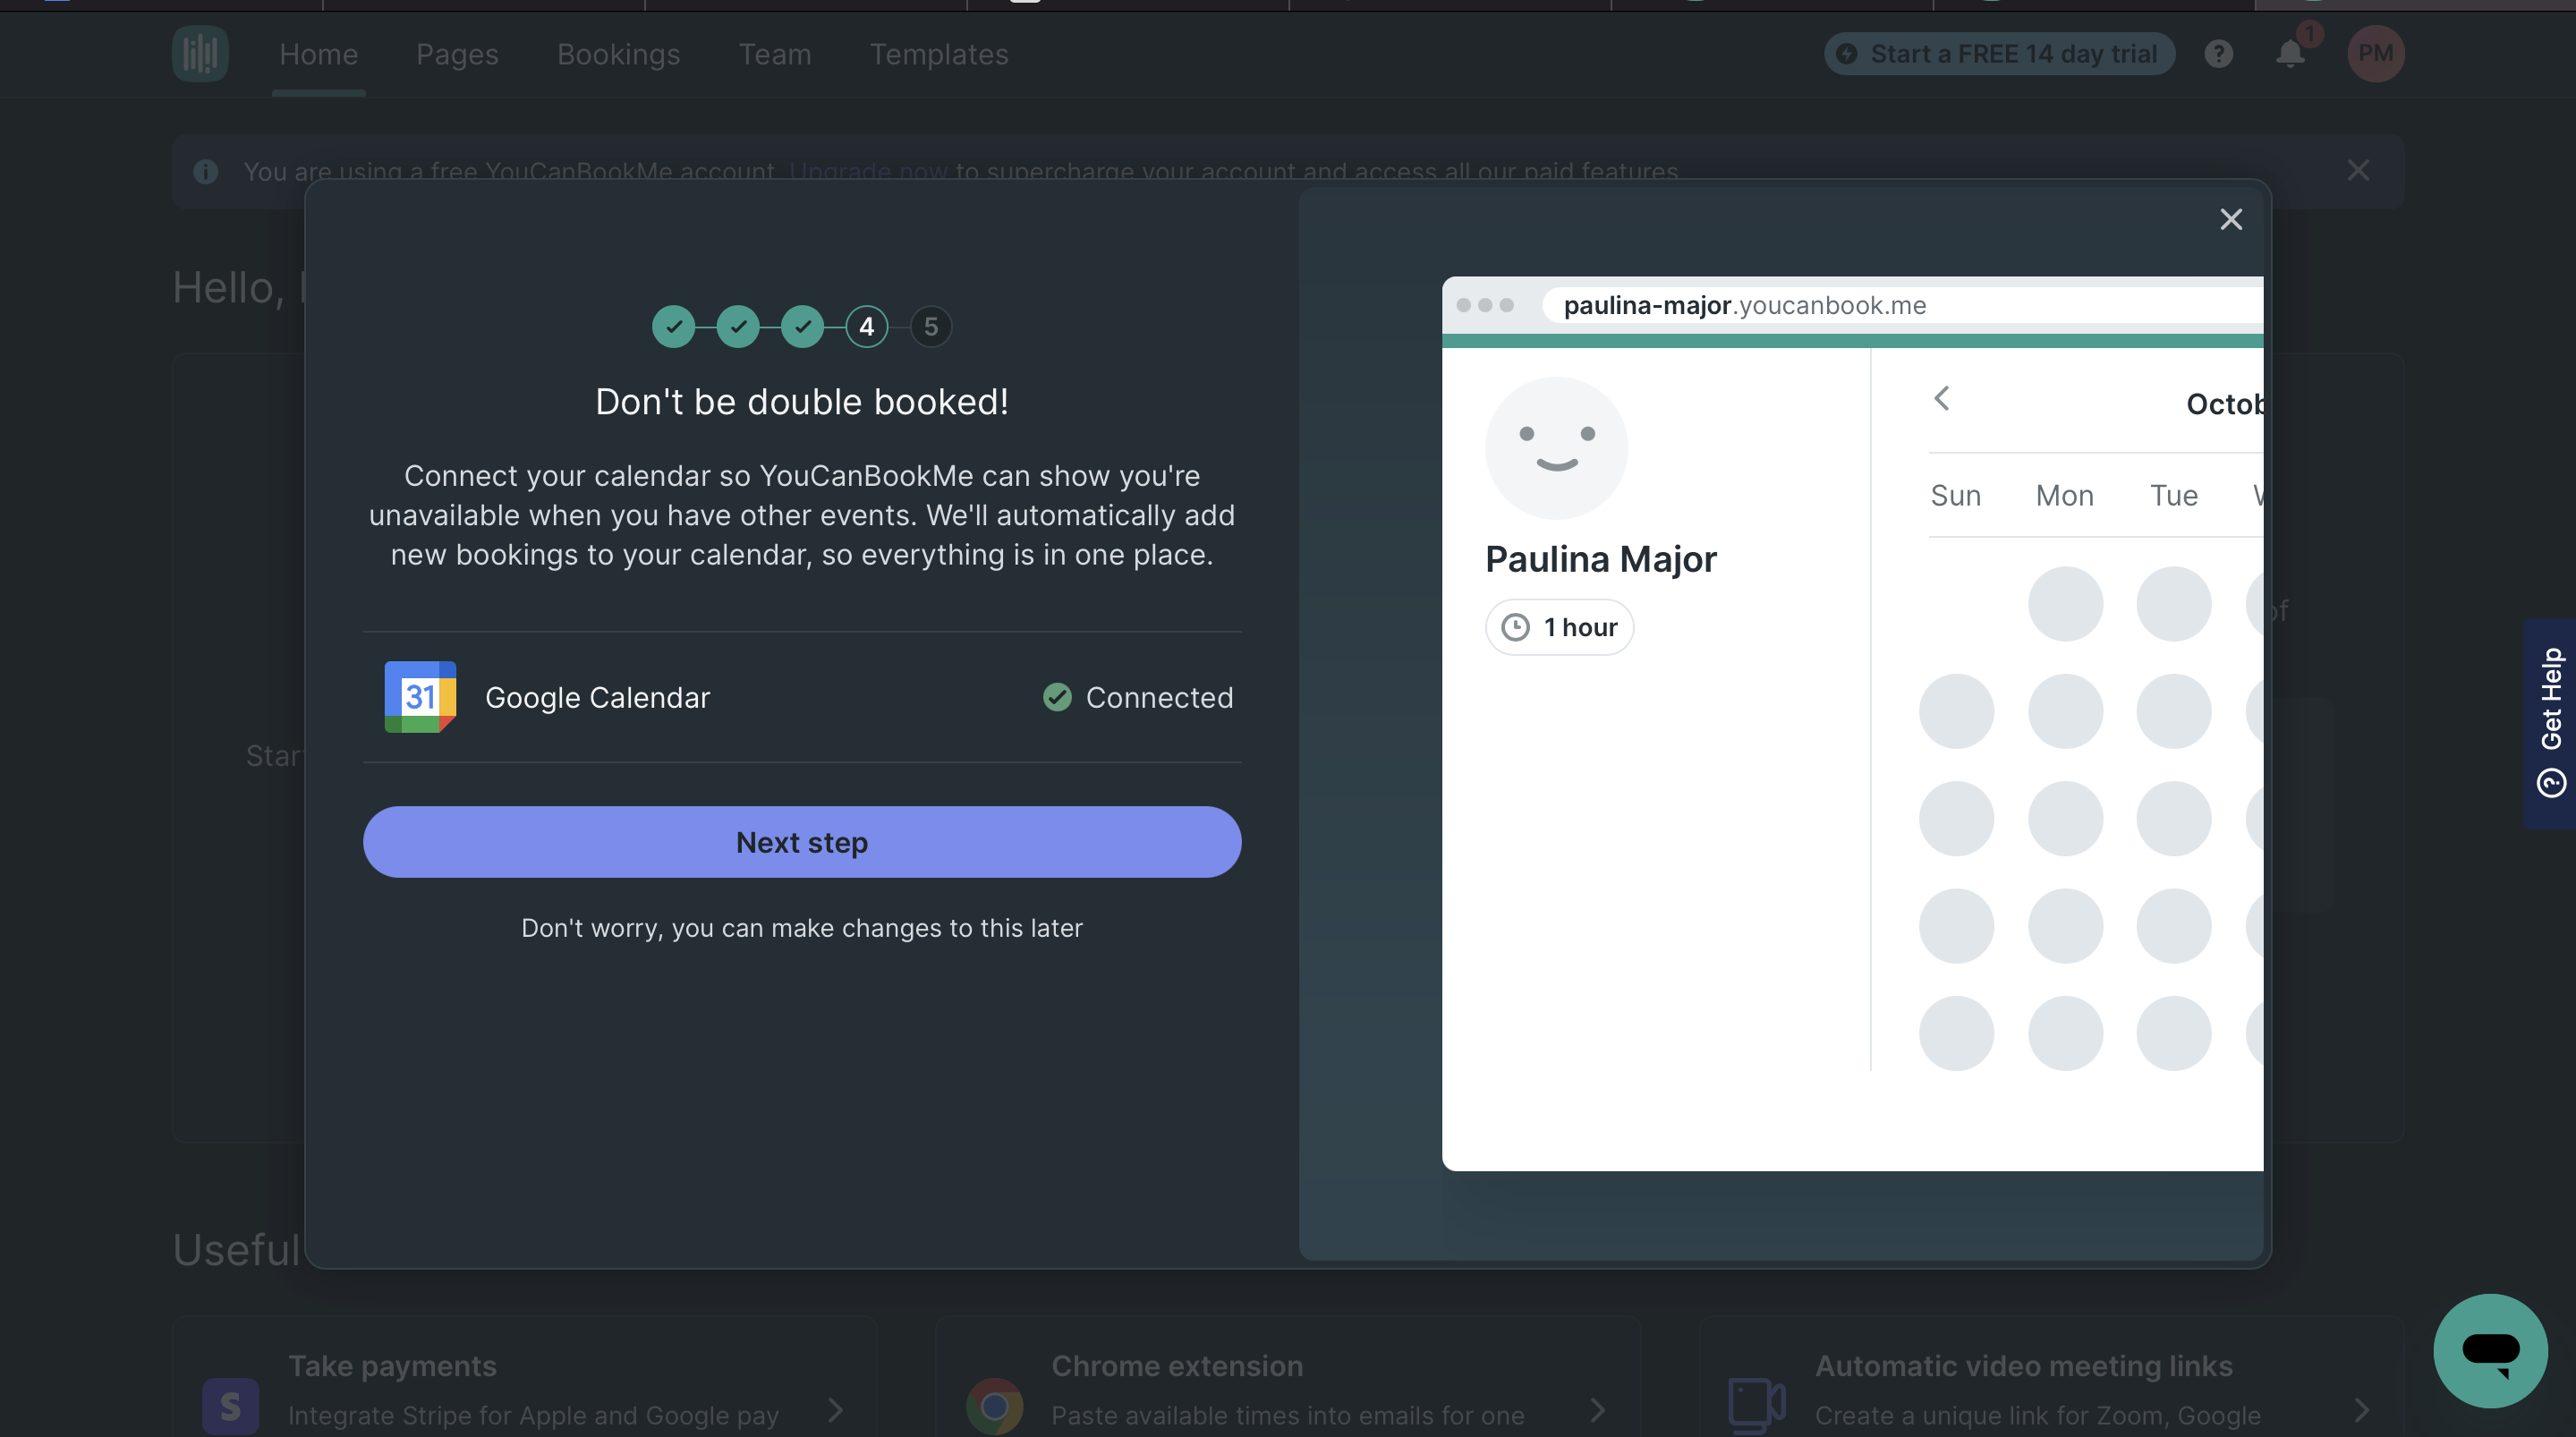
Step 2: During the booking page setup, connect your Google Calendar.
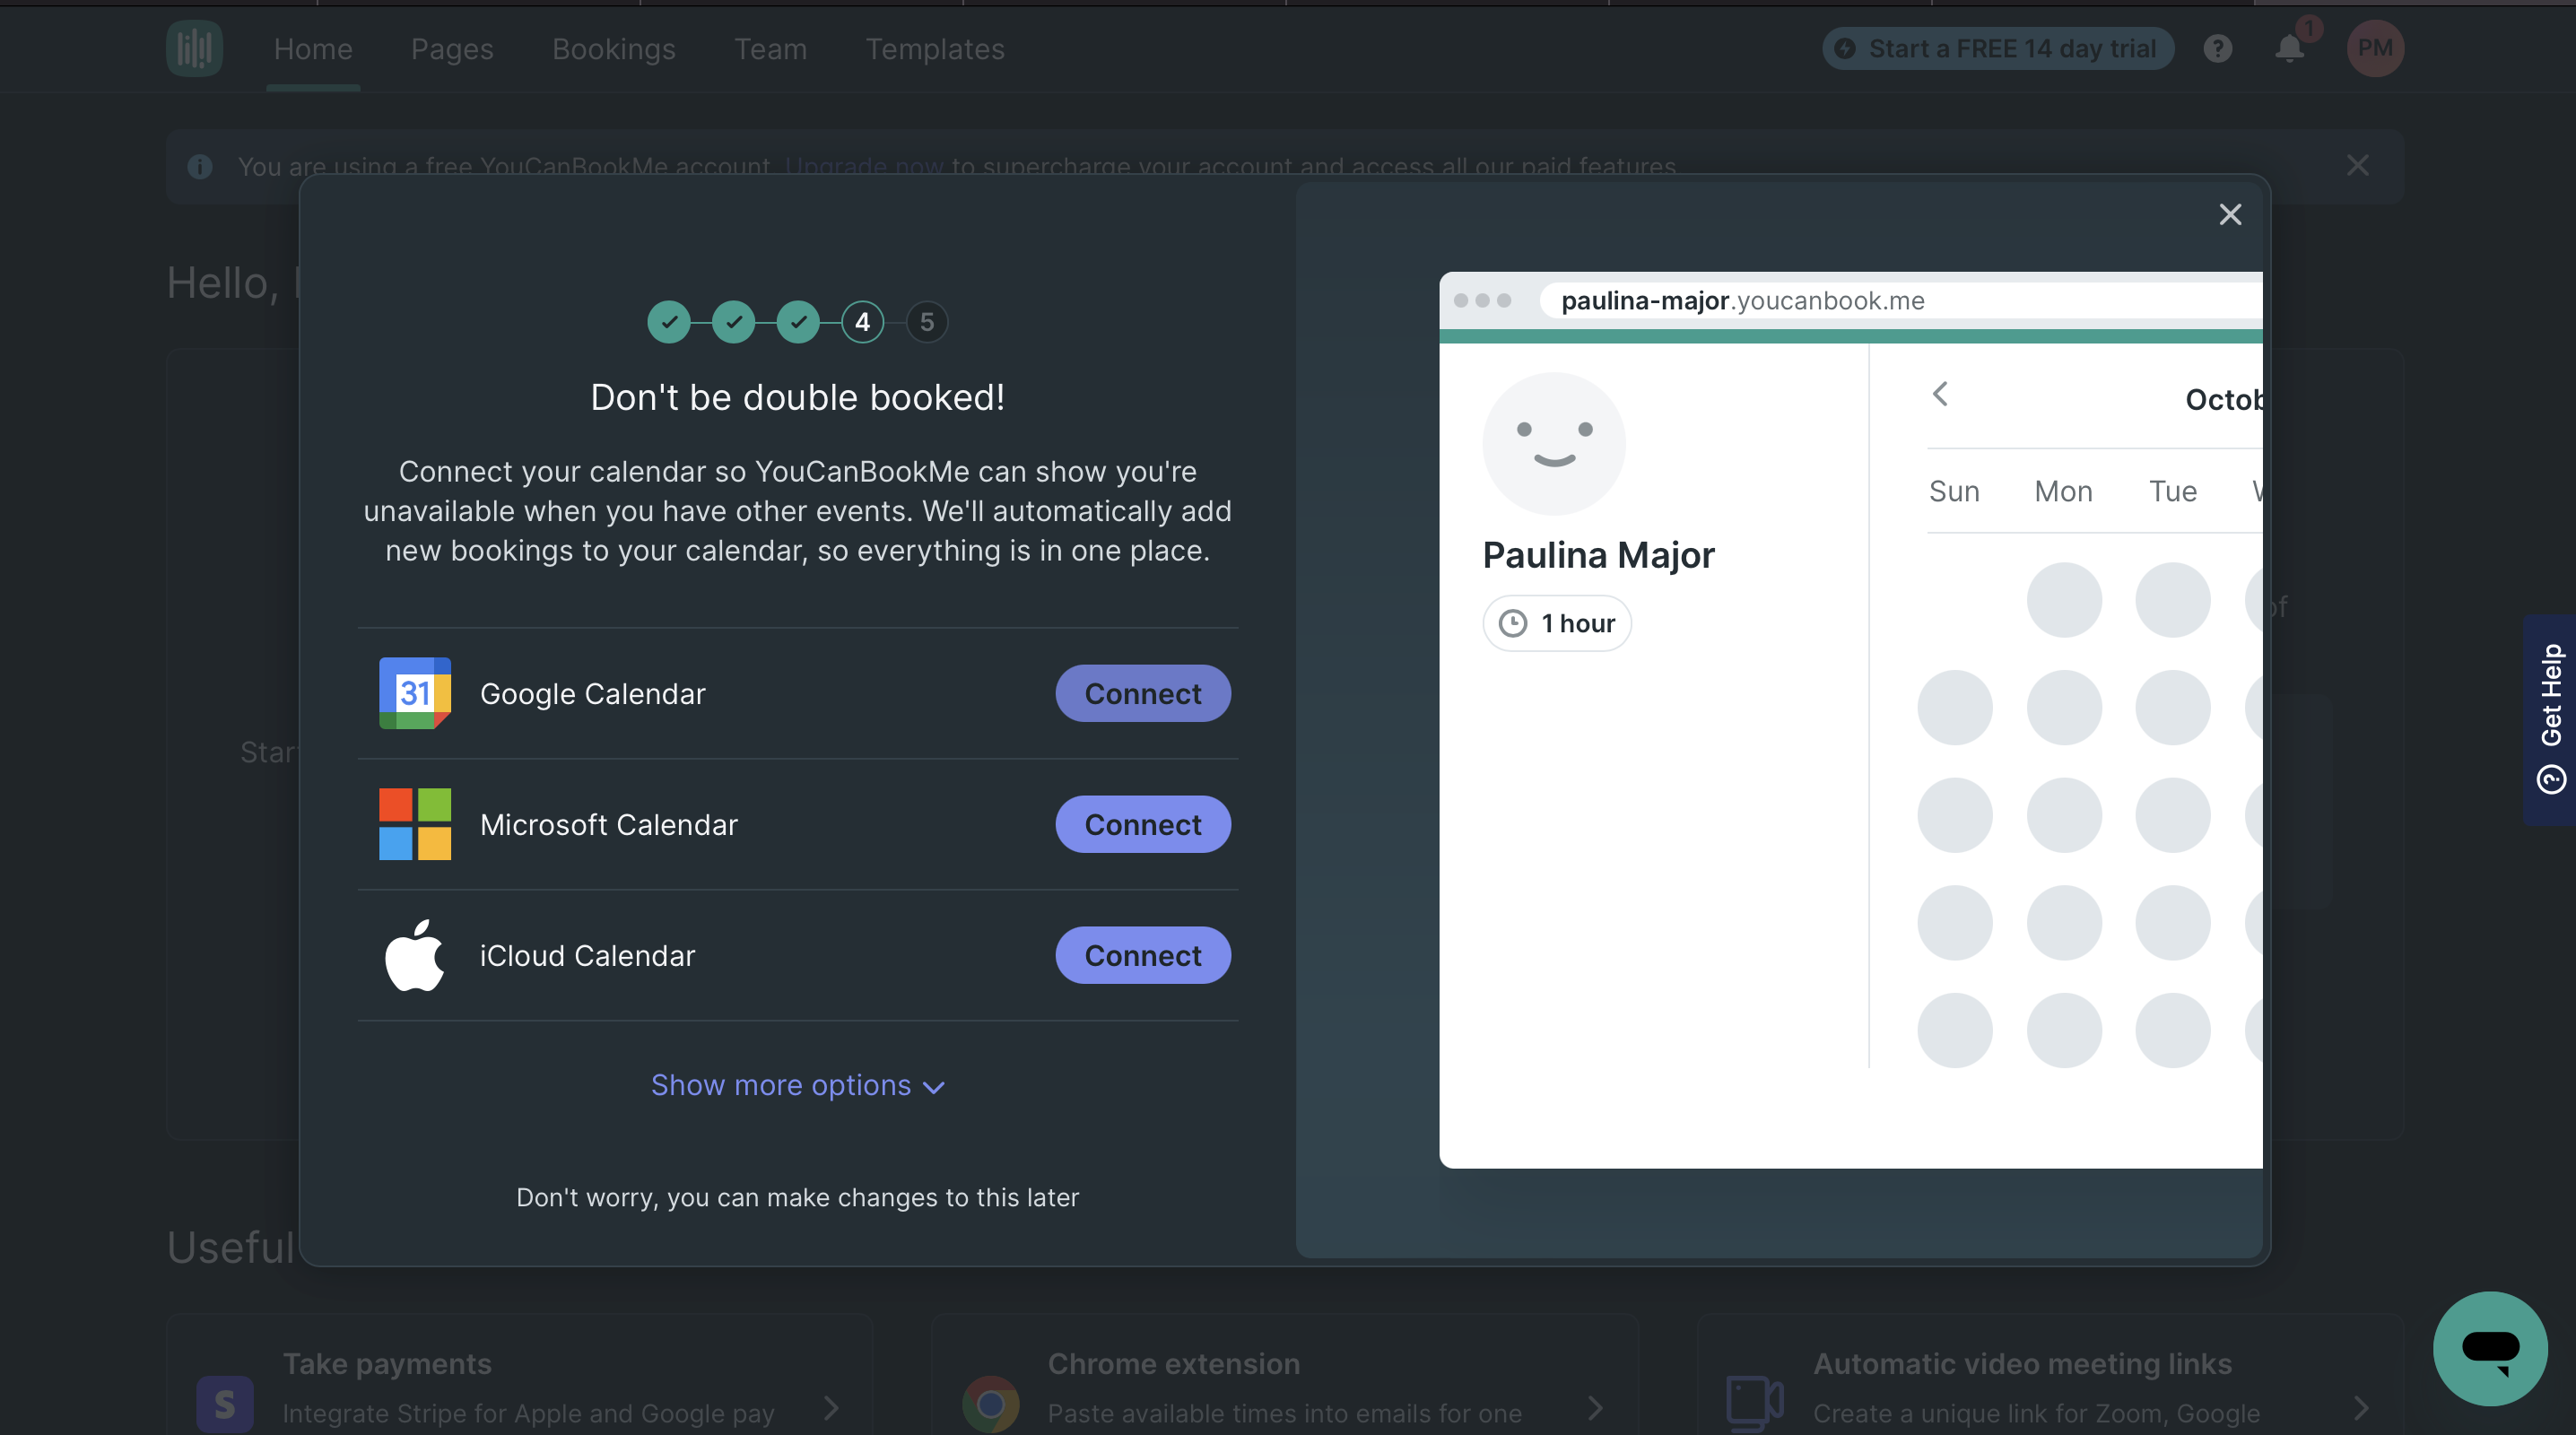
Step 3: Follow the on-screen integration instructions.
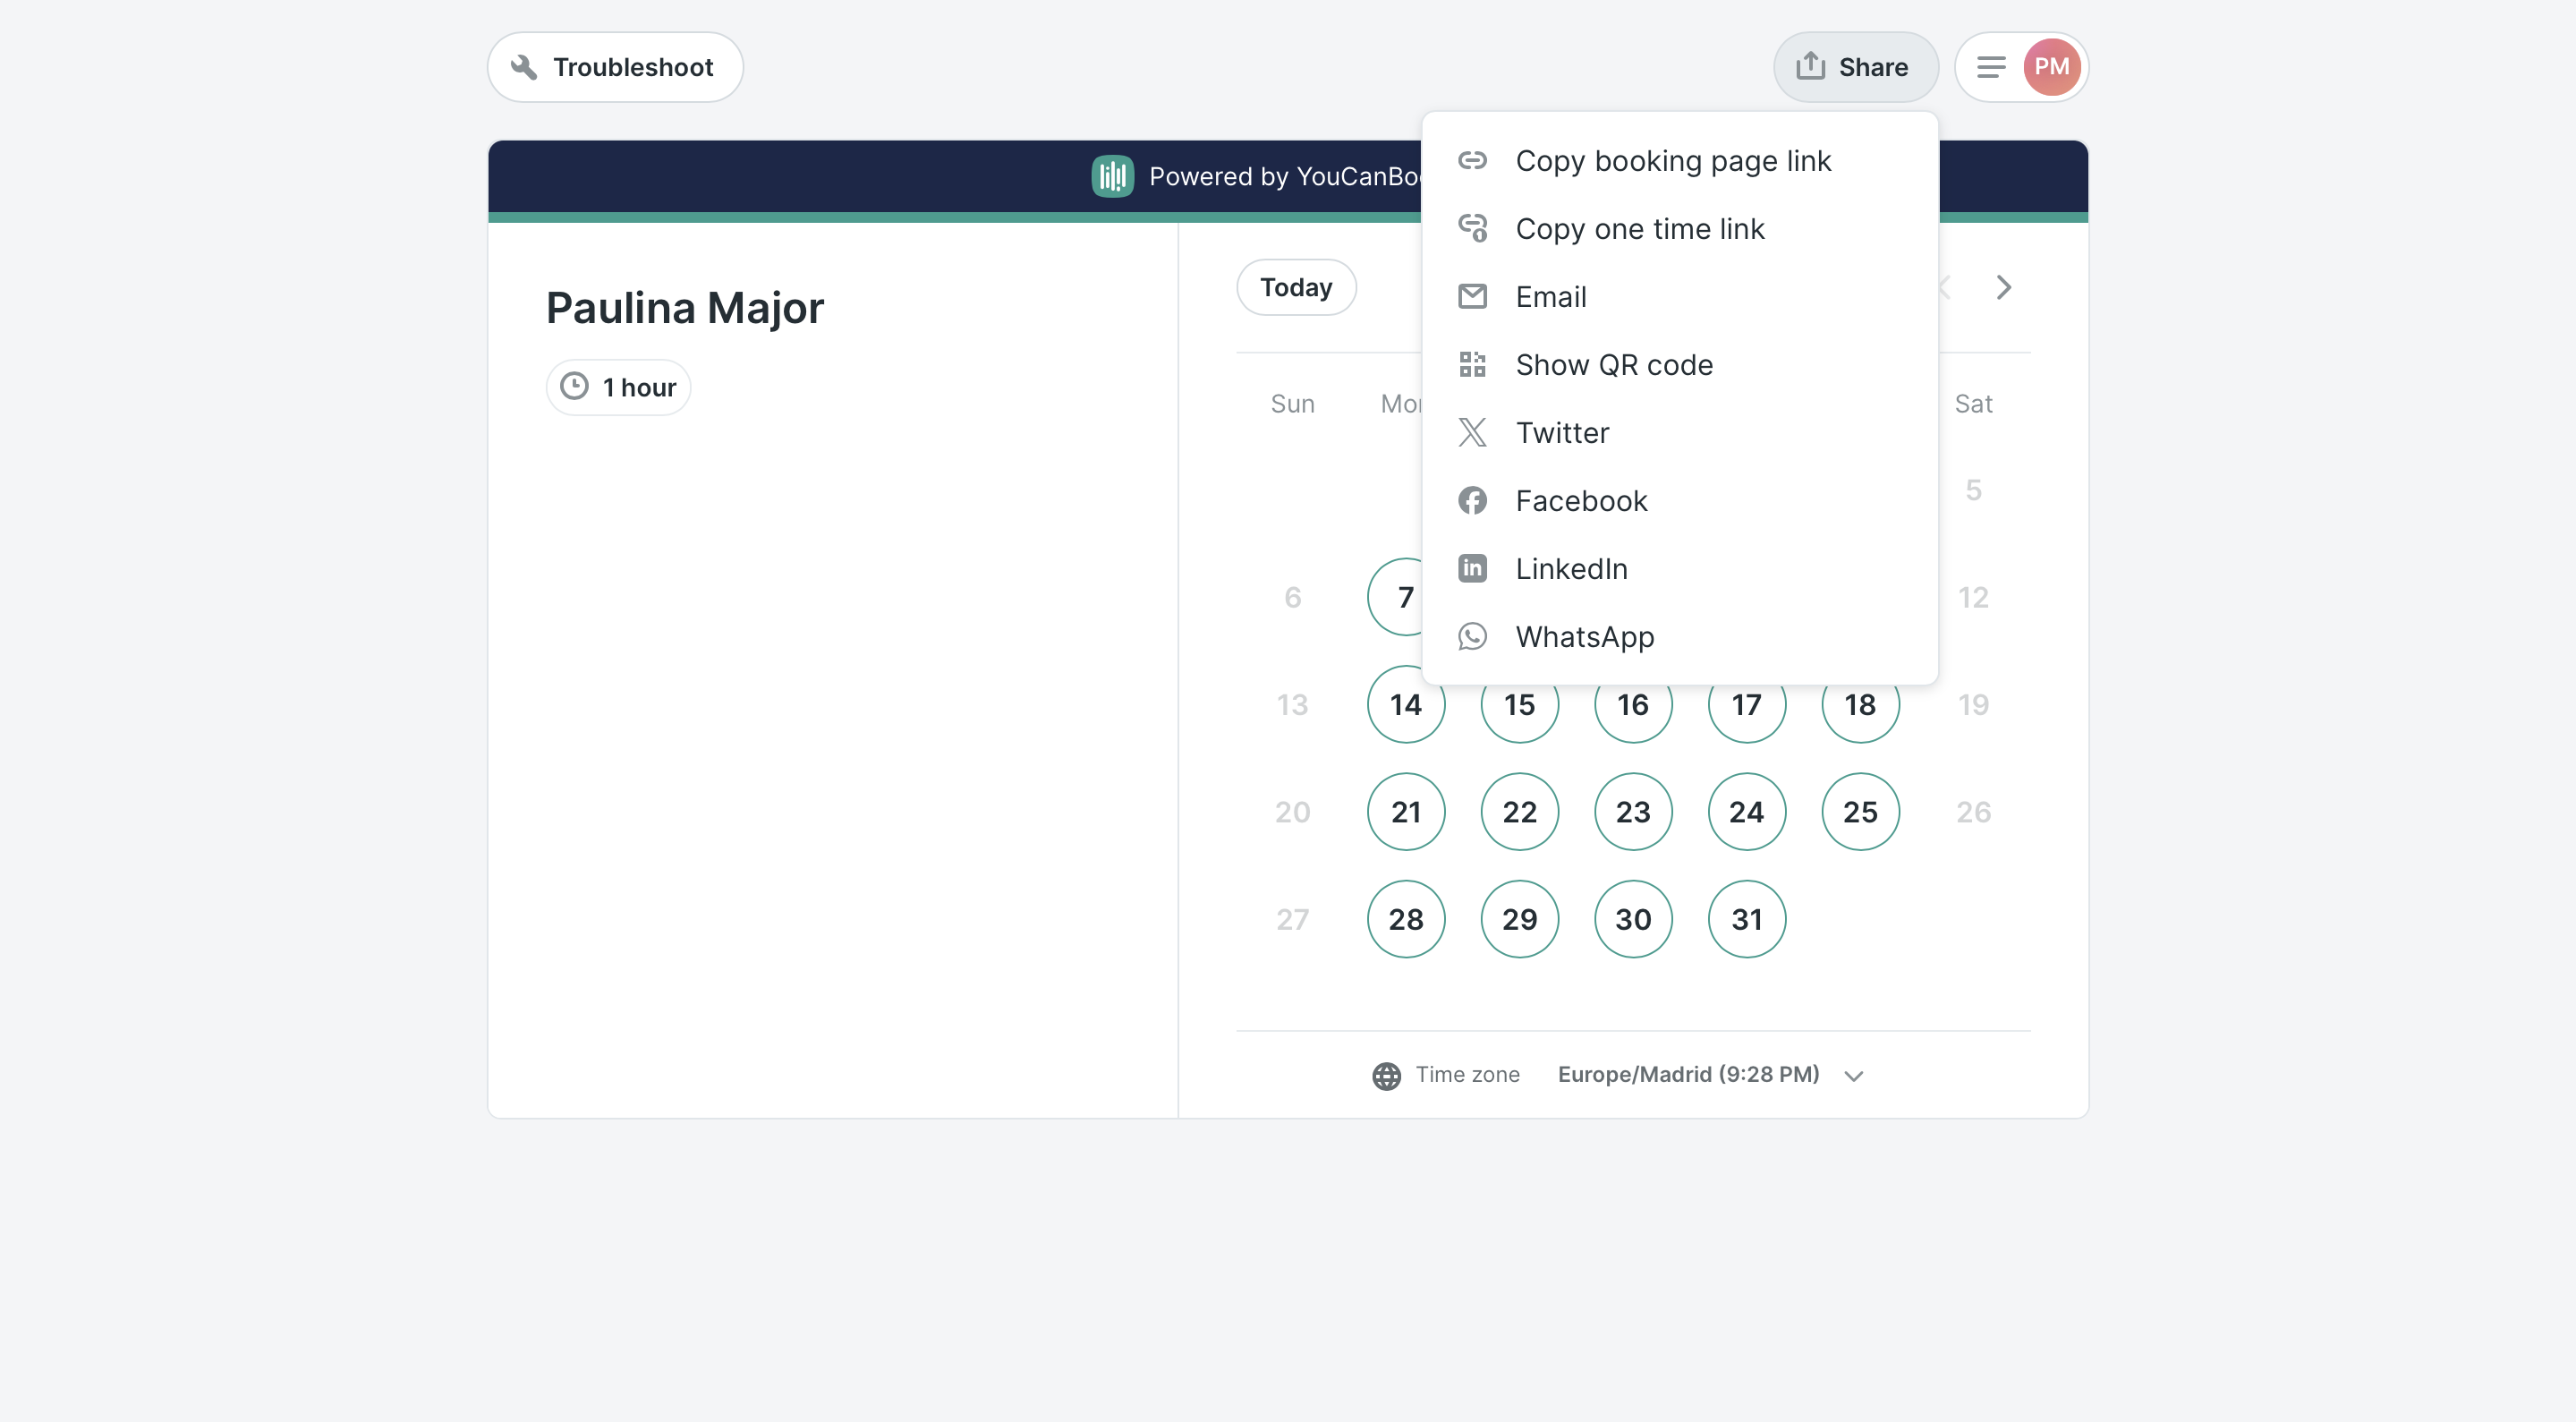
Step 4: Once your Google Calendar is integrated with YouCanBookMe, it's time to share your scheduling link. Go to the top right corner of your booking page, click on Share, and choose the option that works best for you. Voila!
|
🤔 Need ideas on how to share your online booking link? Check out this blog post packed with real-life examples you can easily apply to your own business. |
Make Google Calendar sharing hassle-free with YouCanBookMe
However you decide to share your calendar, choose the method that works best for you.
That said, if you’re looking for a powerful and easy-to-use scheduling tool, YouCanBookMe is perfect for small business owners and entrepreneurs. Sign up for free (no credit card required) and get more organized today!
FAQ
Can two people use the same Google Calendar?
Yes, two people can use the same Google Calendar. Simply share the calendar with the other person, and they can view and, if given permission, edit events.
How do I allow multiple people to edit Google Calendar?
To allow multiple people to edit a Google Calendar, go to the calendar settings, find "Share with specific people or groups," add their email addresses, and set their permission to "Make changes to events."
How do I share a Google Calendar from my iPhone?
You can’t share your whole Google Calendar from the app on your iPhone—that’s something you can only do on a desktop. But, you can still share individual events! Just open the event, hit the edit button, and add the email addresses of the people you want to invite under "Add guests." Adjust their permissions, and you're good to go!
How do I share a Google Calendar from my Android?
How do I change the owner of a Google Calendar invite?

Written by
Paulina Major
Paulina Major is a freelance B2B content writer who has spent the last two years deep in the world of scheduling — writing about booking best practices, time management, and the tools that help small businesses run more efficiently. She writes from experience: as a solopreneur managing her own clients and calendar, she lives the challenges her readers are trying to solve.
Get started today
Join thousands of coaches, consultants, and entrepreneurs who use YouCanBookMe to power their business. Get your first booking in a few minutes.
